

When I built my PC around the Intel Core i5 12600K back in 2022, I made a mistake that I think many first-time builders make. I already knew that the 12600K processor used the LGA1700 socket, so I looked for a motherboard with the same socket. I found an H610 motherboard at a good price and ordered it. It worked fine, and my PC booted. But I wanted to overclock my 12600K, and when I tried, I got to know that the H610 chipset doesn’t allow it. So, I had to return it and go for an MSI Pro Z690-A instead. This taught me an important lesson. A matching CPU socket does not always mean that the motherboard is the right match for you. A lot of things depend on the chipset and BIOS. So, nothing should be ignored.
Now, I started off with an advanced example, and I know that most of you are not aware of even the very basics of CPU and motherboard compatibility. But, I think I have given you the three primary elements to decide your board, i.e., socket type, chipset, and BIOS. There are many other things that we are going to discuss in this article.
But, to get started, keep in mind that the socket decides whether the CPU physically fits. The chipset decides whether the board supports that CPU generation at all along with additional features like PCIe speed. And the BIOS decides whether the board can recognize the CPU when you press the power button. The fastest way to check all three is your motherboard’s CPU support list.
This guide covers mainstream desktop CPUs. HEDT and server sockets like AMD’s sTR5 and Intel’s LGA4677 follow the same logic, but that is a topic for another day. Before starting, I hope you have finalized your CPU because that is the first step. But, if you haven’t picked a CPU yet, start with my guide on choosing the right CPU.
So, let’s get started.
What is a CPU socket?
A CPU socket is simply the connector on the motherboard that holds the processor. Basically, it provides the connection from the CPU to the rest of the board. Power goes into the CPU through it. Data goes in and out through it. Kind of a physical handshake between your CPU and your motherboard.
Every socket has a fixed number of contacts, a fixed layout, and a fixed shape. Intel names its sockets after the contact count. LGA1700 has 1,700 contacts. LGA1851 has 1,851. AMD uses family names instead, like AM4 and AM5.
If the socket doesn’t match, nothing else matters. The CPU will not go in.
LGA, PGA, and BGA: the three socket types
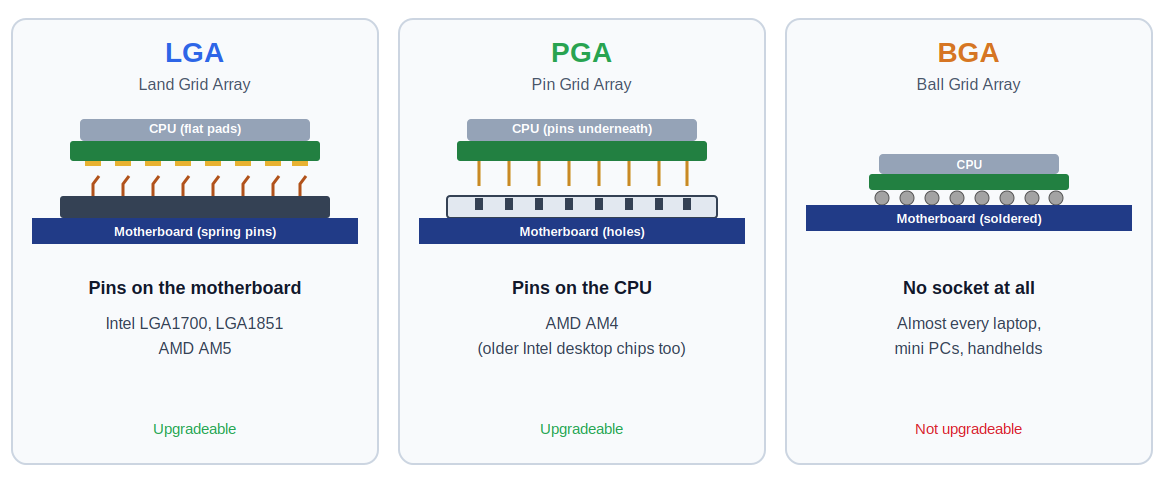
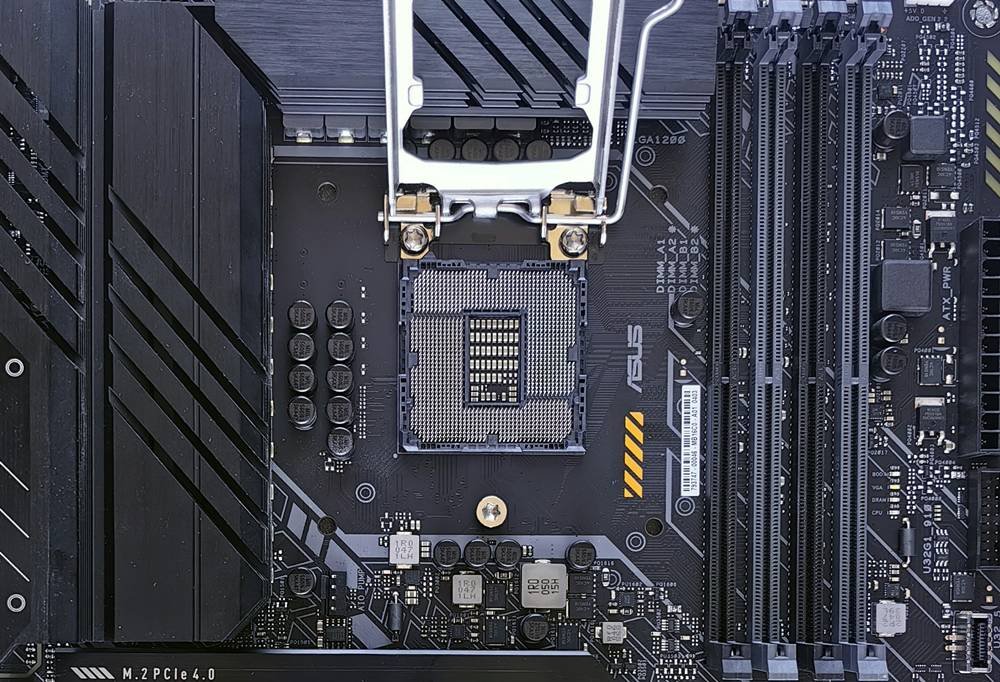
1. LGA (Land Grid Array)
The pins are on the motherboard. The CPU only has flat gold pads underneath. All modern Intel desktop CPUs use LGA, and so does AMD’s AM5.
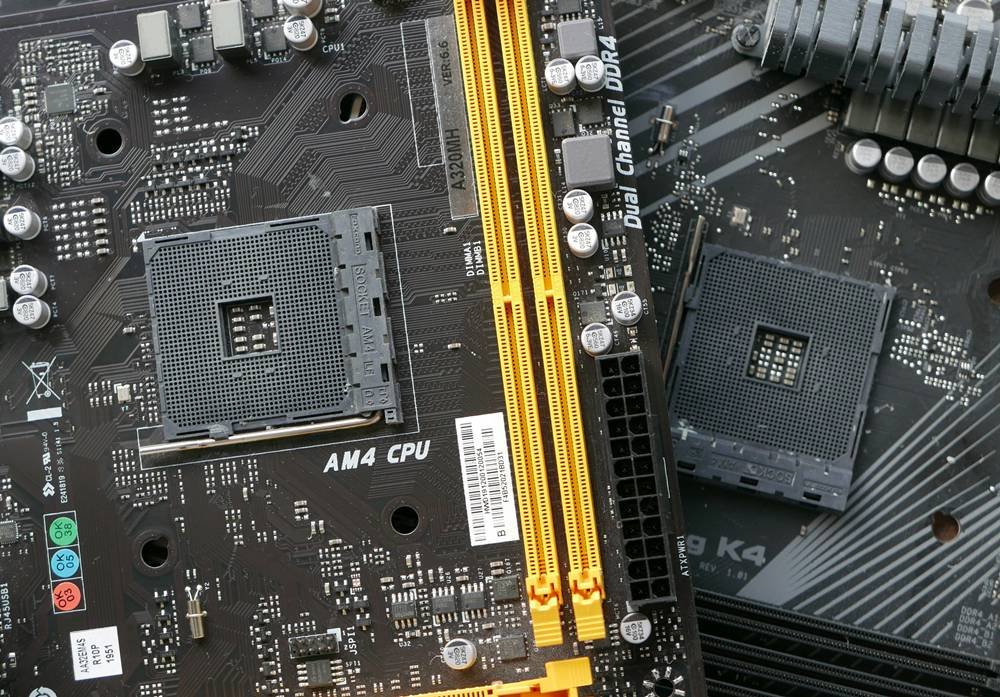
2. PGA (Pin Grid Array)
The pins are on the CPU. The motherboard socket has matching holes. AMD’s AM4 is the last mainstream desktop PGA socket.
3. BGA (Ball Grid Array)
There is no socket. The CPU is soldered directly to the board. Almost every laptop, mini PC, and handheld uses BGA.
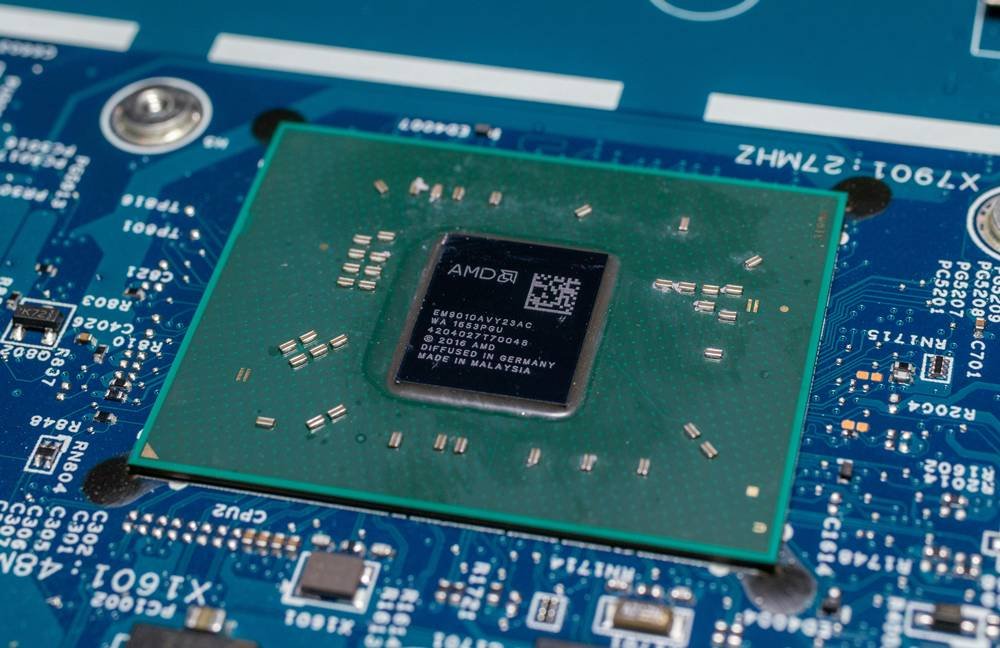
So, if you are hoping to upgrade your laptop CPU, you basically can’t do it.
One thing to note is where the fragile part sits. With LGA, the delicate pins are on your motherboard. With PGA, they are on your CPU. A bent pin on an Intel or AM5 system means a damaged motherboard. A bent pin on AM4 means a damaged CPU. Below are the real images of the socket types.
Sometimes, the CPU doesn’t work even if the socket is the same
You can imagine a CPU socket like a wall plug.
Different countries can have different types of plugs. A plug from one country might physically fit a socket in another country. But if the voltage is different, your device still won’t work properly. The shape was only the first check. CPUs work something like this. The physical connection is the first step, but there are 2 more things. Let’s discuss them one by one.
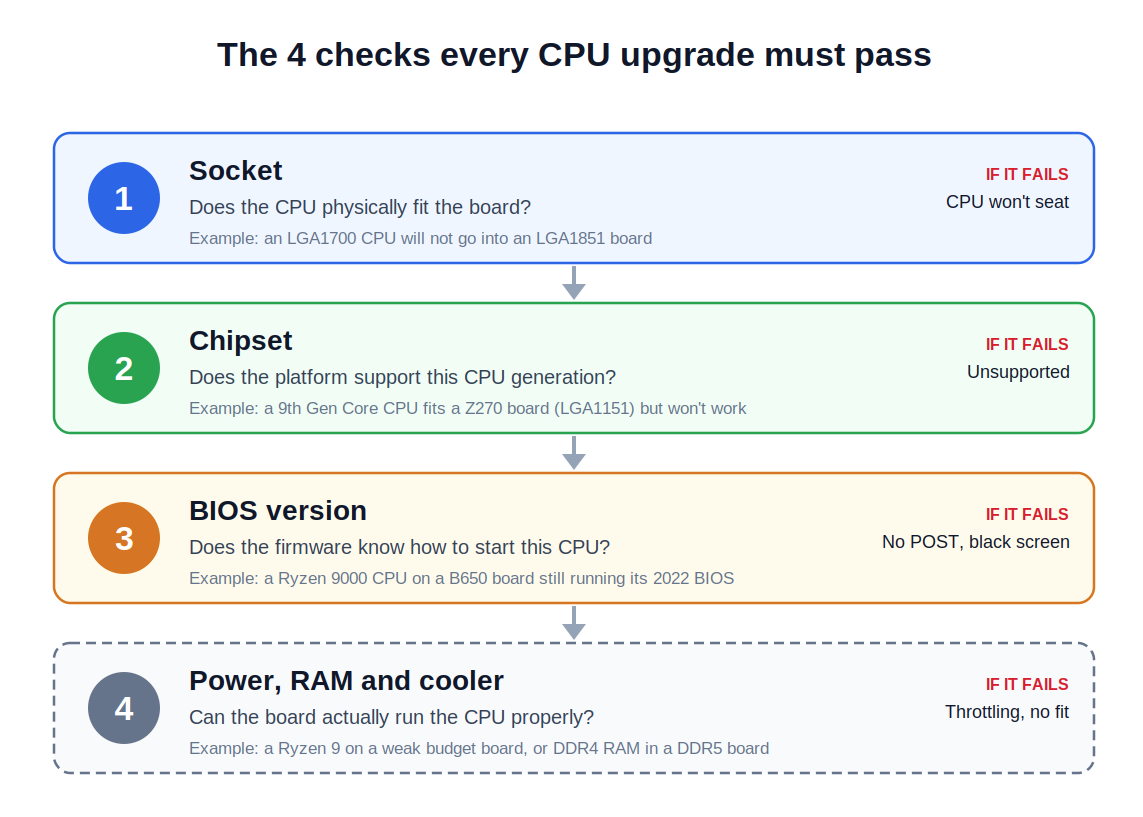
1. Socket (Physical Fit)
This is the easiest selection to make. The CPU and motherboard must use the same socket.
An LGA1700 chip will not go into an LGA1851 board, even though the two look almost identical. An AM4 Ryzen will not go into an AM5. And Intel and AMD sockets are never compatible with each other.
2. Chipset (Platform Support)
While the CPU is the main hub for all the computational things along with direct access to system memory and a set of high-speed PCIe lanes, the chipset provides additional I/O connectivity, such as extra PCIe lanes, USB ports, SATA ports, etc.
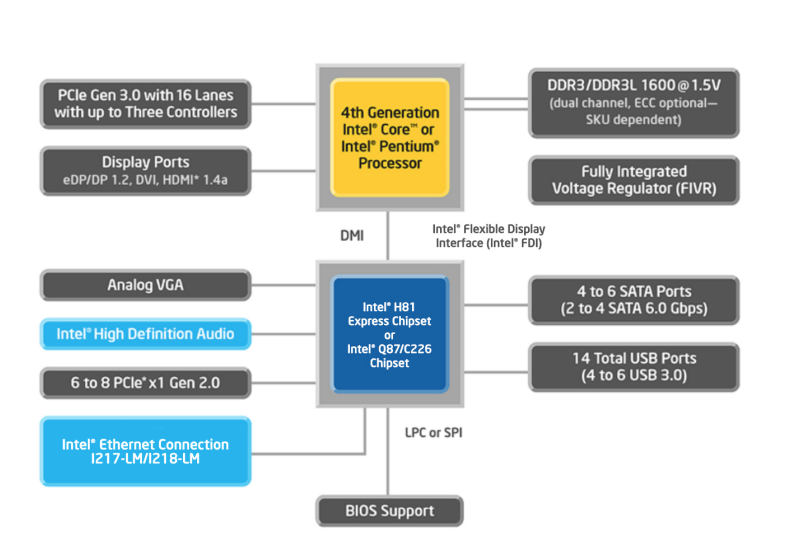
But it isn’t just an extra chip on the board. It decides something more important for us. It decides which CPU generations the board officially supports.
Here is an example for you.
Intel’s 6th and 7th Gen Core CPUs used the LGA1151 socket. Intel’s 8th and 9th Gen Core CPUs also used LGA1151. Same name. Same 1,151 contacts. Same physical shape.
But a Core i7-8700K doesn’t work in a Z270 board. And a Core i7-7700K doesn’t work in a Z370 board.
But how can it be possible?
Intel changed the internal working of those contacts, mostly to deliver more power for the higher core counts of the 8th Gen. So, 8th and 9th Gen chips only work with 300-series chipsets. The socket stayed the same but not the platform.
In other words, a matching socket tells you the CPU will fit. It doesn’t tell you the CPU will work.
AMD is much milder in this sense.
Every AM4 CPU fits every AM4 board. But the B550 and A520 chipsets don’t officially support Ryzen 1000 and 2000 CPUs. We will look at the full matrix below.
3. BIOS
This is the most confusing thing for most people.
The BIOS (or UEFI firmware on modern boards) is the first code that runs when you power on your PC. It has all the instructions the motherboard needs to start a specific CPU. On AMD boards, part of that comes from a package called AGESA. On Intel boards, it includes Intel’s CPU microcode and platform code.
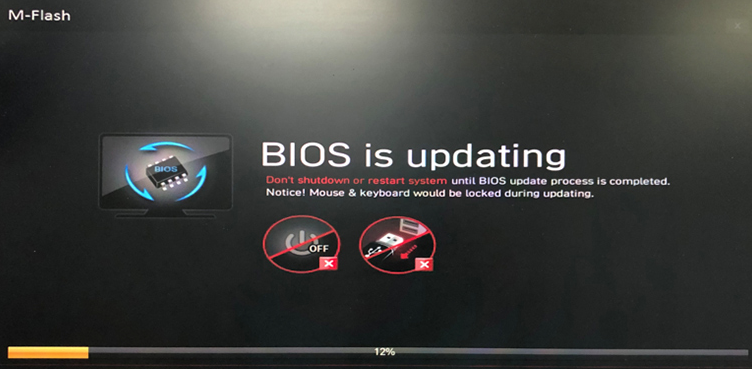
But what is the problem?
A motherboard made in 2022 has no idea that a 2026 CPU exists. Unless someone updates its BIOS, it simply doesn’t know how to start that chip.
So, what happens when you do that? Nothing meaningful. Because the BIOS doesn’t recognize that CPU, it just spins the fans and lights up the RGB lights. You can get nothing on the display because the BIOS doesn’t know how to interact with your specific CPU. Many boards also light a red CPU debug LED.
Some popular examples of this thing inside the same socket are as follows.
- 13th and 14th Gen Intel on early Z690 and B660 boards
- Ryzen 9000 on B650 and X670 boards from the Ryzen 7000 launch
- Core Ultra 200S Plus on Z890 and B860 boards bought before March 2026
In three of these examples, you need a BIOS update in order to get these CPUs working. The last one is the recent example. The Arrow Lake Refresh (200S Plus) uses the same LGA1851 socket and the same 800-series boards as the original Core Ultra 200S. But you still need to update the BIOS update to run it.
4. Power, Memory, and Cooling
Although the first three decide the compatibility between the CPU and motherboard, the board still has to run the CPU properly. So, you should keep the memory, power, and cooling compatibility of your CPU and motherboard when planning a purpose.
These things will not usually stop your CPU from booting, but they can surely stop it from performing at its fullest. I have discussed this in detail below in the article.
Intel Desktop Socket Compatibility Table
I am starting off with Intel because it has made the CPU motherboard compatibility a little more complex to understand for the end user. But I have gathered the data and created this table for you.
| Socket | Launched | Supported CPUs | Chipsets |
|---|---|---|---|
| LGA1151 (v1) | 2015 | 6th and 7th Gen Core (Skylake, Kaby Lake) | 100 and 200 series (Z170, H170, B150, Z270, B250…) |
| LGA1151 (v2) | 2017 | 8th and 9th Gen Core (Coffee Lake) | 300 series (Z370, Z390, B360, H310…) |
| LGA1200 | 2020 | 10th and 11th Gen Core (Comet Lake, Rocket Lake) | 400 and 500 series (Z490, B460, Z590, B560…) |
| LGA1700 | 2021 | 12th, 13th and 14th Gen Core (Alder Lake, Raptor Lake) | 600 and 700 series (Z690, B660, Z790, B760…) |
| LGA1851 | 2024 | Core Ultra 200S and Core Ultra 200S Plus (Arrow Lake) | 800 series (Z890, B860, H810) |
| LGA1954 | Expected late 2026 / early 2027 | Core Ultra 400 “Nova Lake-S” | 900 series (Z990, Z970, B960, Q970, W980, based on leaks) |
A few things to mention.
1. 11th Gen doesn’t work on every LGA1200 board. Intel’s H410 and B460 boards don’t support 11th Gen Core CPUs. The Z490 and H470 boards generally do, with a BIOS update. 500-series boards support 11th Gen and most 10th Gen chips.
2. LGA1700 boards are either DDR4 or DDR5. Never both. The 12th, 13th, and 14th Gen CPUs support both memory types. The motherboard decides which one you get. So, check the board before you buy RAM.
3. LGA1851 is a dead end. Intel’s next desktop chips, the Core Ultra 400 series (Nova Lake-S), use the new LGA1954 socket. They will not work on Z890, B860, or H810 boards. If you buy an LGA1851 board today, the best CPU it will ever run is already on the shelf.
4. LGA1954 details are still partly leaked. Intel has linked Nova Lake-S to LGA1954 in its own tooling, but the chipset list and launch date come from reports. I will update this table once Intel launches the platform.
AMD Desktop Socket Compatibility Table
AMD is known for keeping things simpler when it comes to CPU motherboard compatibility. In fact, there are only two sockets you need to care about.
| Socket | Type | Launched | Supported CPUs | Chipsets | Memory |
|---|---|---|---|---|---|
| AM4 | PGA (1,331 pins) | 2017 | Ryzen 1000, 2000, 3000, 4000G, 5000 (including 5800X3D) | A320, B350, X370, B450, X470, A520, B550, X570 | DDR4 only |
| AM5 | LGA (1,718 contacts) | 2022 | Ryzen 7000, 8000G, 9000 (including X3D chips), upcoming Zen 6 | A620, B650, B650E, X670, X670E, B840, B850, X870, X870E | DDR5 only |
The Ryzen AM4 Mess
It is true that every AM4 CPU fits the AM4 board. But actual support and whether the system will boot depend on the chipset and BIOS. And there can be chances where everything inserts fine but your system doesn’t work. Here is how it goes.
| Chipset | Ryzen 1000 | Ryzen 2000 | Ryzen 3000 | Ryzen 5000 |
|---|---|---|---|---|
| A320, B350, X370 | Yes | Yes (BIOS update) | Most boards (BIOS update) | Many boards (BIOS updates from 2022) |
| B450, X470 | Yes | Yes | Yes (BIOS update) | Yes (BIOS update) |
| X570 | Not officially | Yes | Yes | Yes (BIOS update) |
| B550, A520 | No | No | Yes (except 3200G and 3400G) | Yes |
Keep in mind that this is a starting point. AMD doesn’t vary their socket types with newer generations, but compatibility can still vary. On AM4, your exact board’s support list is the final word, because manufacturers made different decisions about which updates to release, especially on 16MB BIOS boards.
AM5 is also not compatible all the time.
Although AM5 supports every AM4 chip on paper, actual compatibility can vary. Especially with the older boards, you will need to do BIOS updates most of the times. For example, a B650 board bought in 2022 needs a newer BIOS (built on AGESA 1.1.7.0 or later) before it can start a Ryzen 9000 chip.
About the future, AMD still sticks to its philosophy with the commitment to AM5 through 2029. AMD announced this at Computex 2026, extending its earlier “2027 and beyond” promise.
AMD’s own technical documentation has listed the upcoming Zen 6 “Olympic Ridge” desktop family under Socket AM5. AMD has not yet announced the processor officially or provided motherboard-specific BIOS requirements, but existing boards with AM5 support will likely require a BIOS update to recognize the new CPUs.
The socket longevity difference between Intel and AMD
In my AMD vs. Intel article, I have discussed a little about how Intel usually gives each socket two CPU generations, while AMD generally keeps their sockets for longer.
I have tried to plot a graph on this.
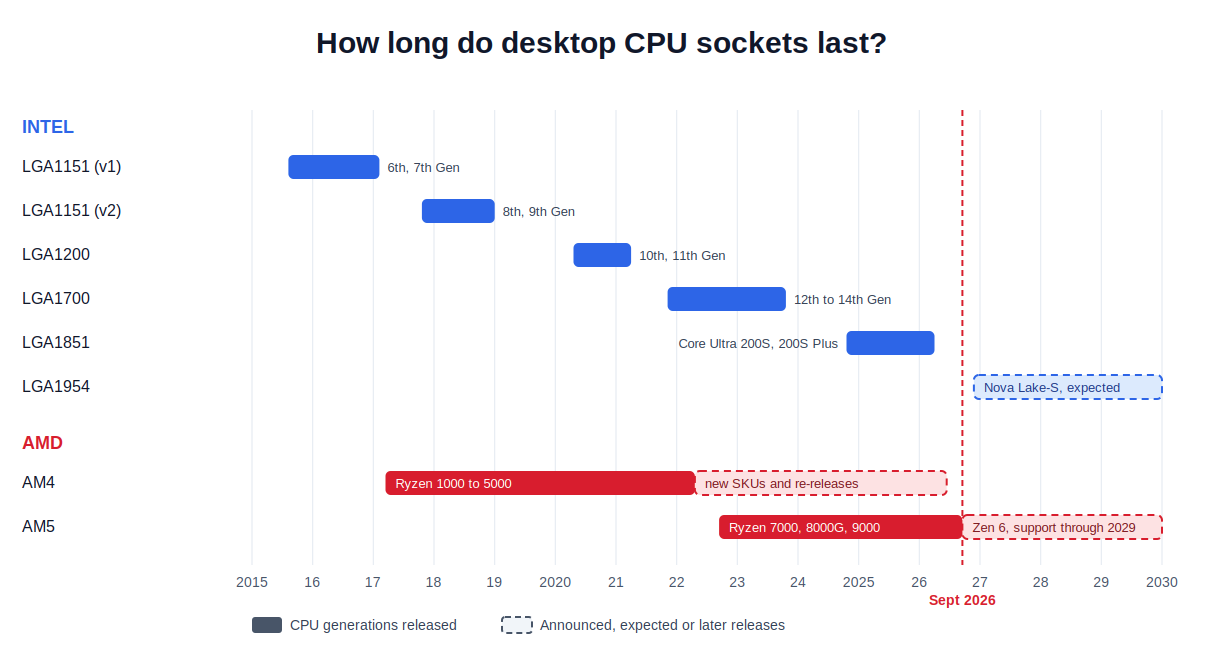
To be specific, Intel usually gives each socket two CPU generations. For example, LGA1151 (v1) got 6th and 7th Gen, and LGA1200 got 10th and 11th Gen, while the LGA1700 stretched to three with the 14th Gen refresh.
AMD has a different approach to it. AM4 launched in 2017 and got Ryzen 1000, 2000, 3000, and 5000, plus APUs. AMD even marked AM4’s 10th anniversary at Computex 2026 with a re-release of the Ryzen 7 5800X3D. AM5 launched in 2022 and, as we discussed above, is officially supported through 2029.
My personal issue with Intel is the platform longevity. If you buy an Intel board, assume the CPU you can buy today is the fastest CPU that board will ever get.
In my case (with my 12600K), I got lucky because Intel has stretched LGA1700 till the 14th generation. However, if I want to upgrade to a Core Ultra 200S (Arrow Lake) CPU, I can’t do that, because they have got the new socket, i.e., LGA1851.
However, there are reports that Intel plans to keep LGA1954 around for several generations and that its Z-series boards will ship with 64MB BIOS chips to make room for future CPUs. If that turns out to be true, it’s a good change.
All in all, if upgradeability matters to you, AM5 is the safer platform to buy into right now. You can buy a mid-range Ryzen today and drop in a faster chip a few years later without touching your RAM or motherboard at all.
How to check CPU and motherboard compatibility for a new build?
Most people check compatibility in one of two ways. They either look at the socket name on the product page or they simply trust a “compatible” filter on a shopping site. Most people head to PCPartPicker for the latter one.
But both the ways cover only the first layer. None of these tell you which BIOS your brand is running right now. Whenever I have to make this decision, I follow this flowchart.
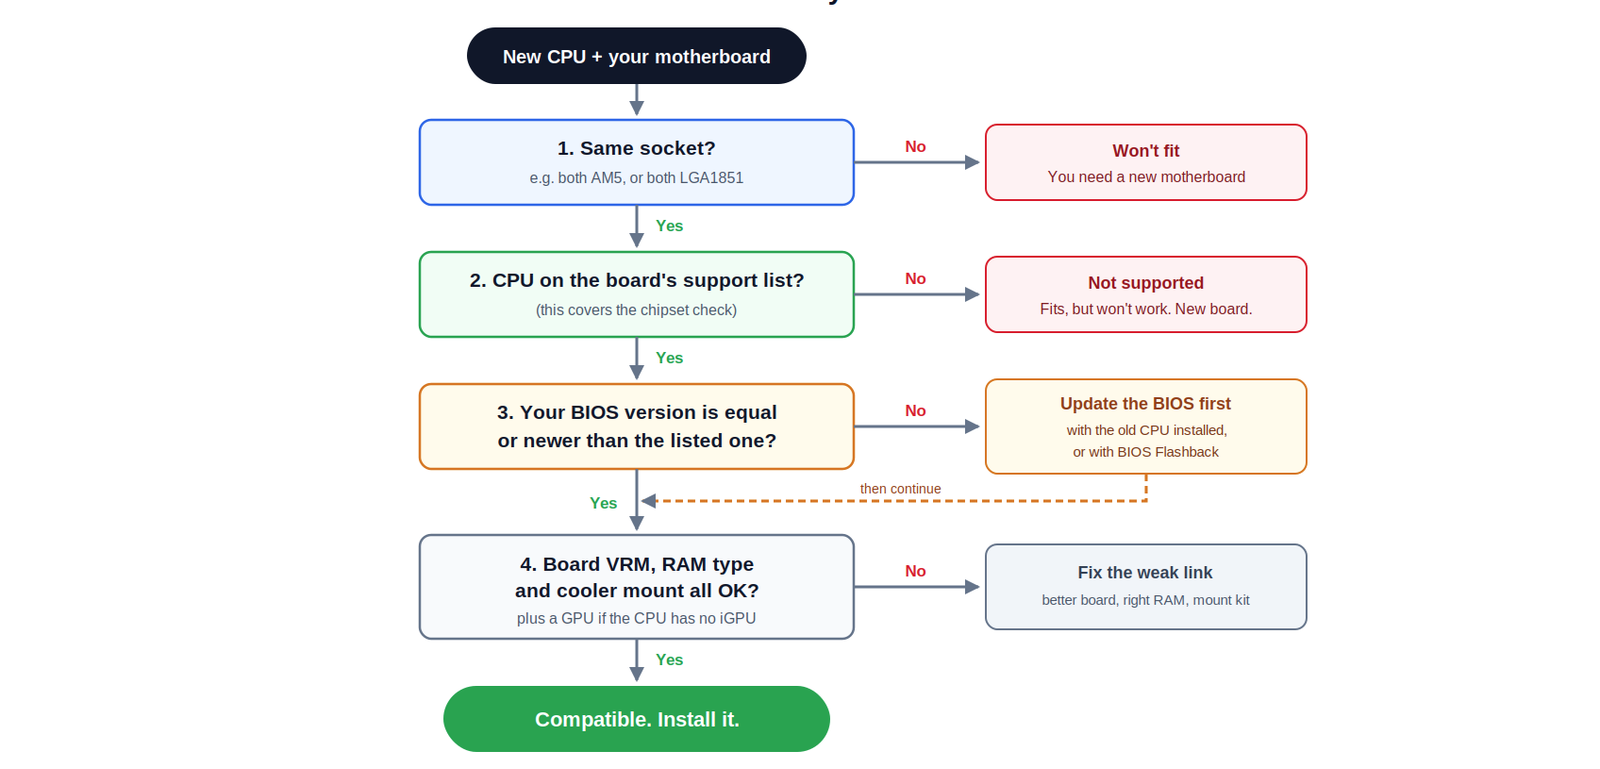
Step 1: Pick your CPU and note things about it.
If you haven’t decided on your CPU yet, look it up on Intel ARK or AMD’s processor specification page. It’s ok to find out your CPU based on the prices from shopping sites like Newegg or Amazon. I just want you to write down these four things about your CPU.
- Socket: listed as Sockets Supported on Intel and CPU Socket on AMD
- Power: Processor Base Power and Maximum Turbo Power on Intel, Default TDP on AMD
- Memory type: DDR4, DDR5, or both
- Integrated graphics: yes or no
I literally write down these things on the paper. (Sorry for my handwriting.) But you got my point right?
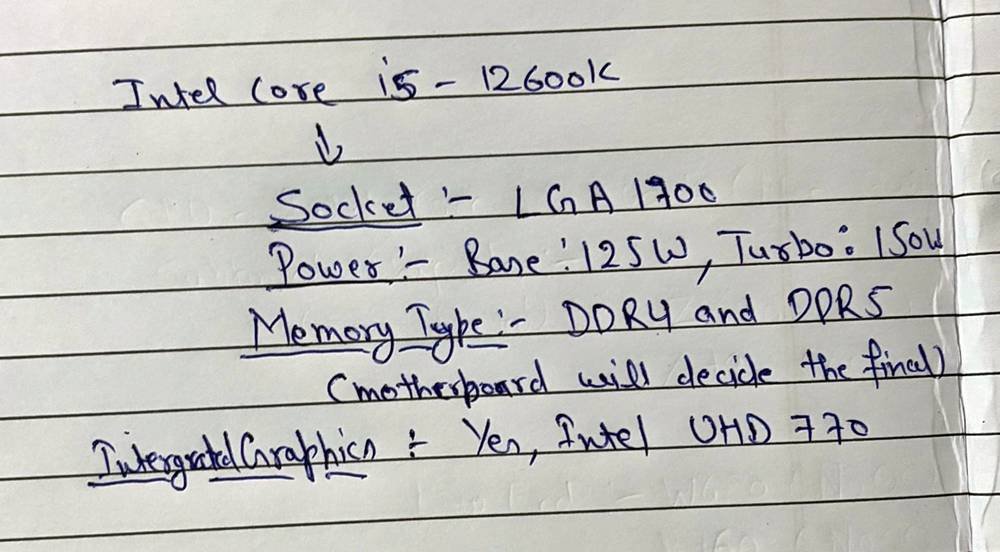
They have a very simple role in your motherboard decision. The socket decides which boards you can look at. The power figure tells you how strong the board’s VRM needs to be. The memory type decides your RAM. And the graphics tell you whether you can boot without a graphics card.
Step 2: Shortlist motherboards with the right socket and a sensible chipset
Theoretically, the first step is to filter boards by socket, although some people jump directly to the chipsets. Yes, I know the socket is inherently tied to a platform, and if a board has a chipset that supports a specific CPU, the socket will support it automatically. But the “socket-first” approach is recommended because it is an easier filter than chipsets when browsing motherboards.
However, I recommend not spending too much time on sorting through sockets. Just jump straight to the chipset and decide the board on its behalf. I still recommend matching the socket type before you buy your board. It reduces the chances of mistakes. Every retailer and PC building site highlights both chipsets and socket types.
For the chipset selection, the road is fairly easy and official. I would recommend you go to the official product page of your CPU. For example, if I go to the 12600K’s product page and go to the compatible products section, it gives me the list of all the chipsets supported by this CPU. Intel does that for all its desktop processors. This way, I have sorted out the chipsets and know which motherboard to shop for. I can simply write these down.
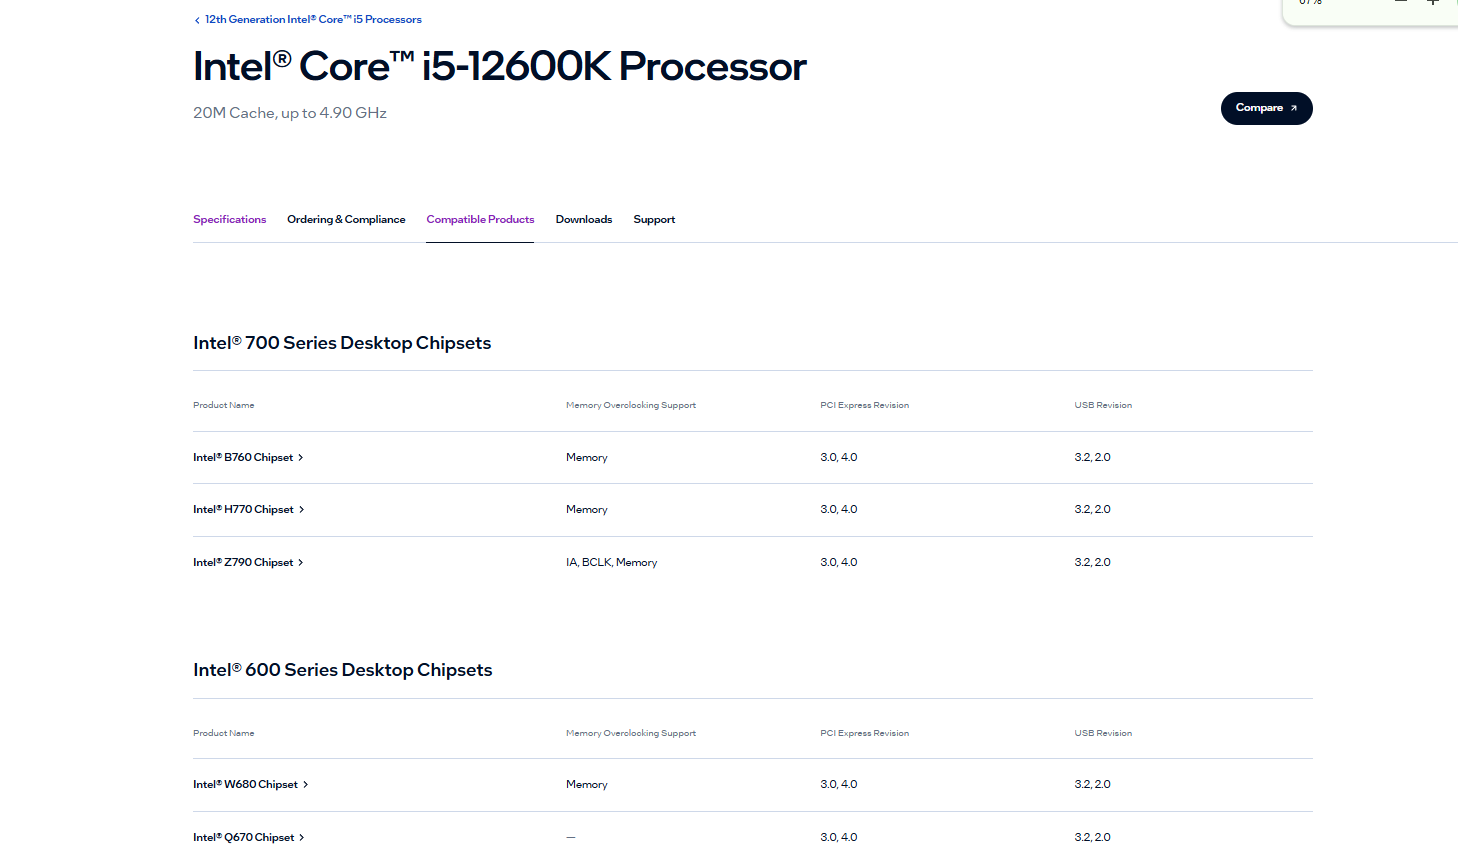
I also love this product compatibility checker from Intel, where I can find compatible products both on the basis of CPU and motherboards.
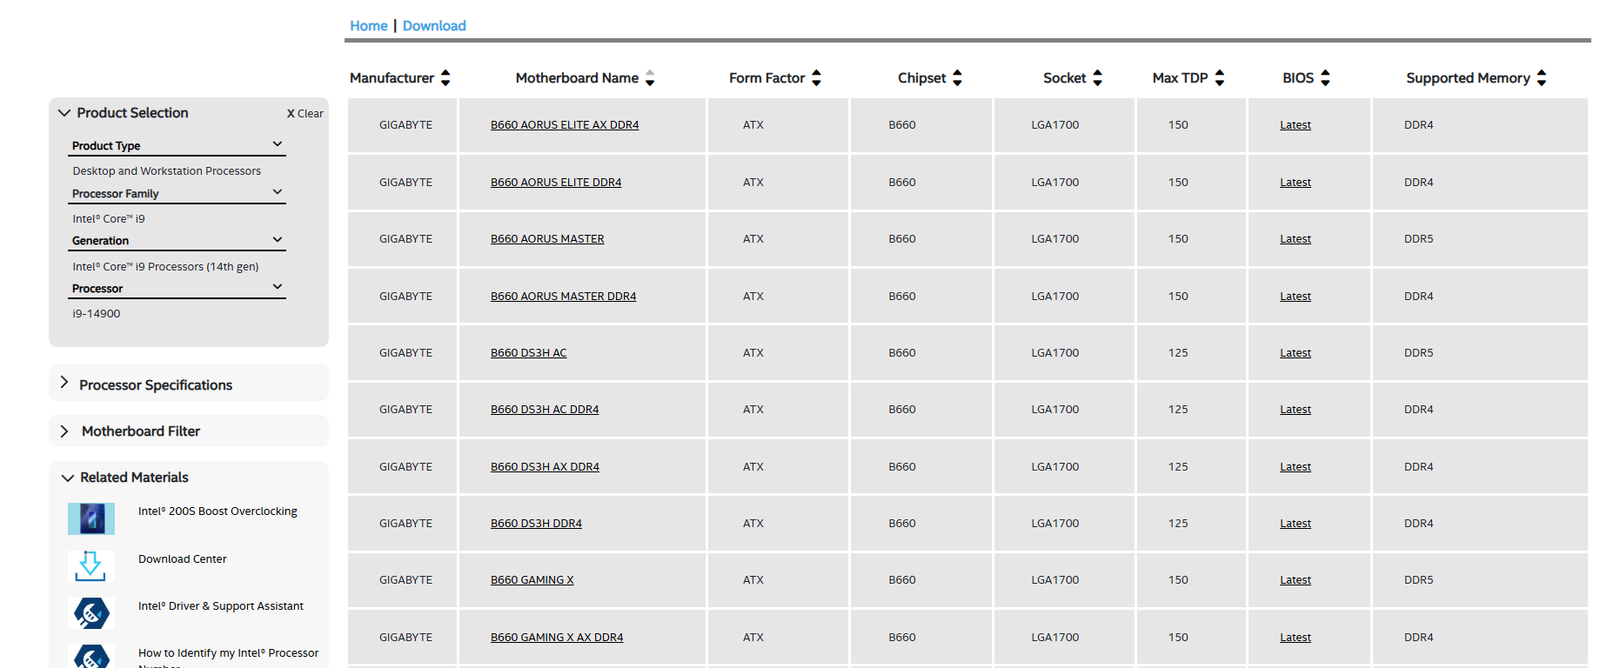
Same goes for the AMD. For example, if I go to the 9900X3D’s product page and scroll down in the general specification section, I get a list of all the supported chipsets for it.
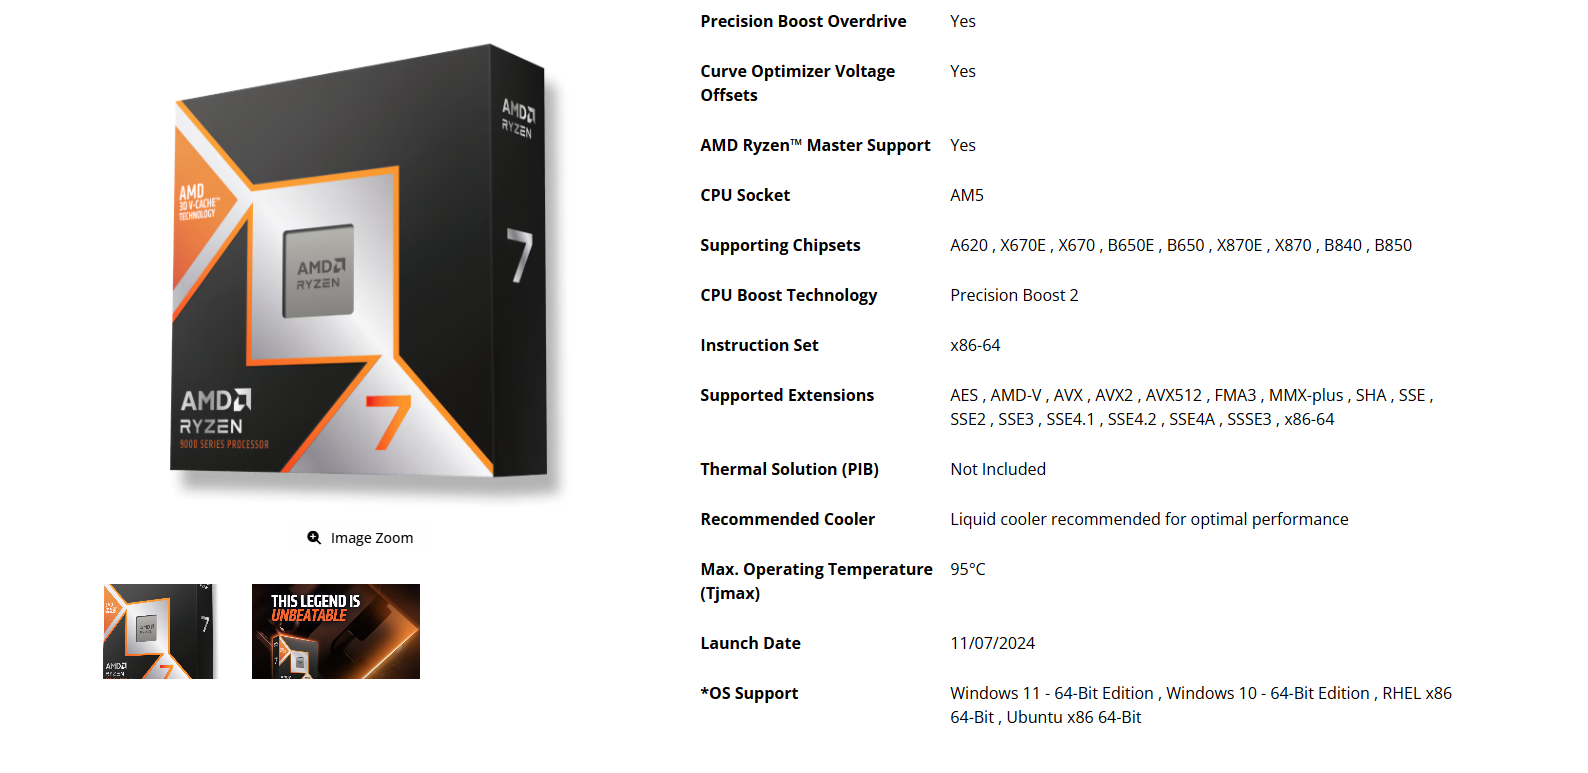
The AMD Partner Motherboard Specifications tool isn’t a direct substitute for Intel’s product compatibility checker, but it also lets you search/filter AMD processor-compatible motherboards by manufacturer and specifications.
The chipset not only decides the software compatibility but also many other things that you are planning to do with your computer. If you buy the wrong chipset, some things might be impossible to do, for example, overclocking on an unlocked CPU.
For example, if I am going for an Intel K-series CPU and want to overclock, I would avoid B860 and H810 boards. Rather, I would go for a Z890 or other board that allows overclocking. Similarly, if I have decided on a Ryzen 5 or Ryzen 7 (including X3D), I would not waste my money on a high-end X870E with features that I would never use. I would rather settle at a B650 or B850.
Keep in mind that, after the socket compatibility, your motherboard decides which features you will use. Overclocking, PCIe speed, memory speed, memory speed/type, storage options, USB support, etc., depend on your chipset. Also, I would not recommend spending a lot of money on just your motherboard unless you have specific goals in mind.
A good example is Wi-Fi boards. If you think you will always be using a wired internet connection, paying extra for the Wi-Fi is unnecessary. After all this, I will be left with a list something like this.
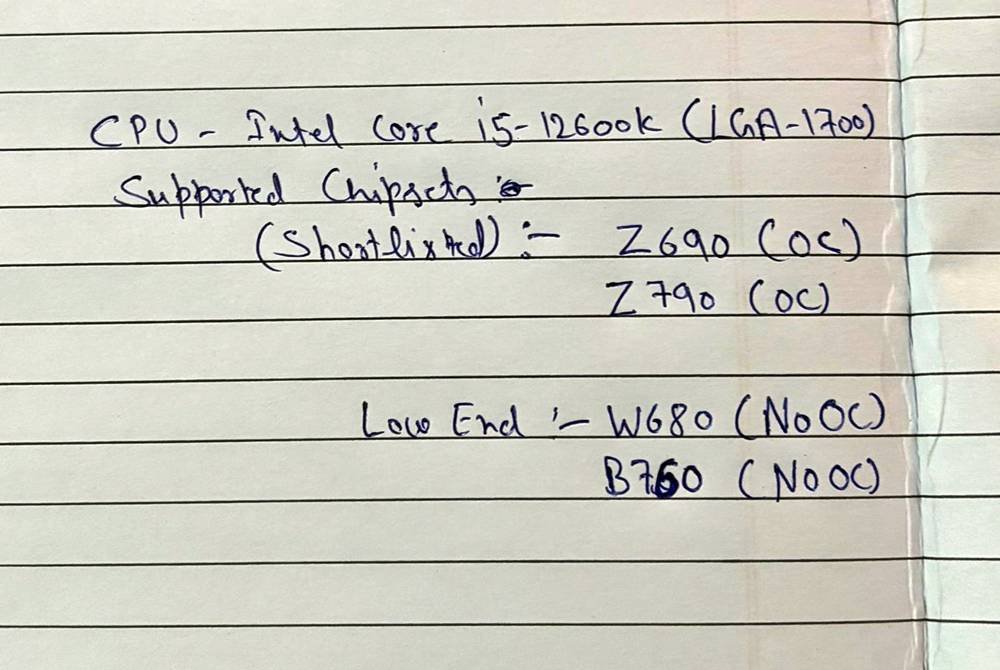
While shortlisting, also check the board size. ATX, Micro-ATX, and Mini-ITX boards need a case that supports that size.
Based on these chipsets, you can pick the available boards in the market. The board name will have to chipset name in its name. For example, you can know that the MSI Pro Z690-A motherboard has the Z690 chipset. You should create list like this one.
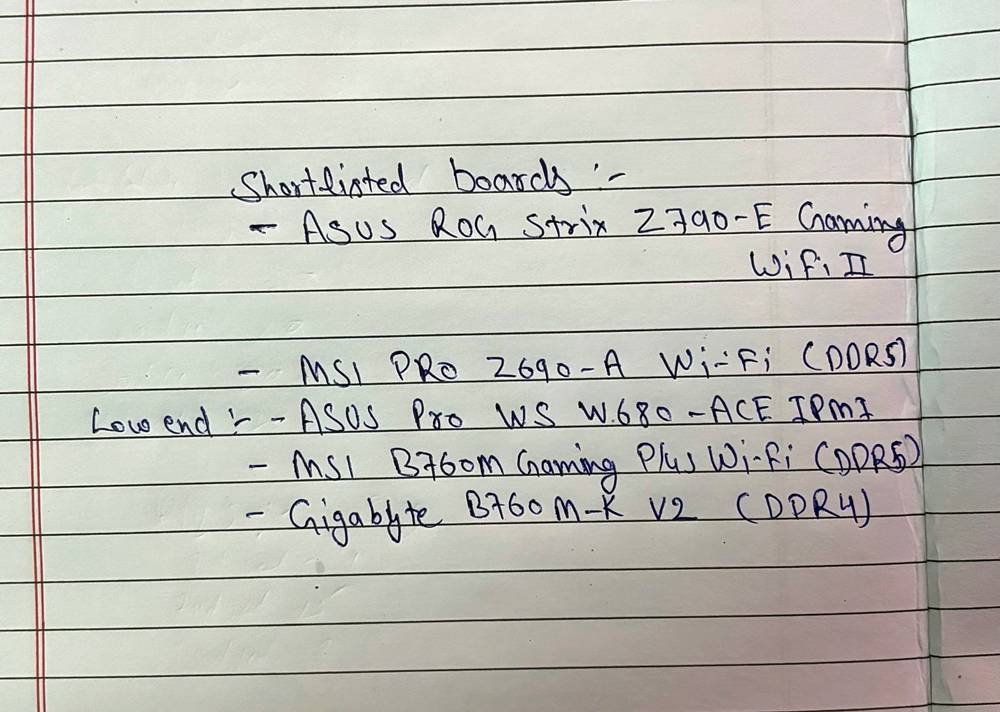
Step 3: Check the CPU support list for every board on your shortlist
What we did with our CPUs can be done with the motherboard. I mean to say if we make a list of motherboards with the compatible chipsets, we can now finalize our motherboards and confirm that they support the CPU we have finalized.
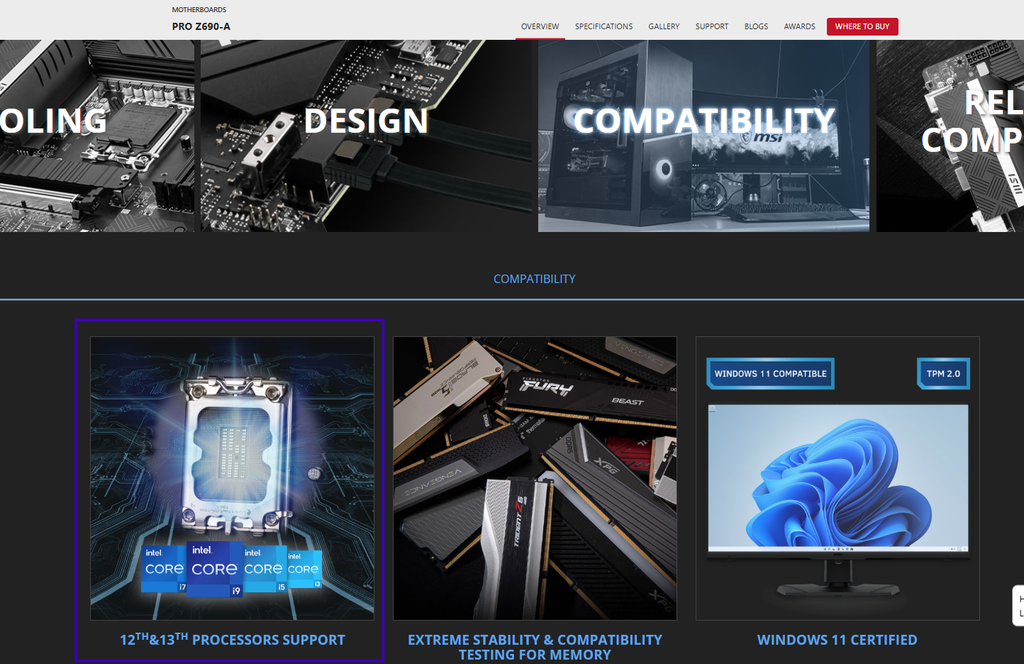
To do this, go to the manufacturer’s website and open the support page of each board. Find the support list (sometimes called CPU QVL). Make sure your exact CPU is listed there. In some cases, only the CPU generation will be provided. In that case, you may have to do a little more research. As a beginner, it is better not to make a blind decision in any case.
- CPU is listed: note the minimum BIOS version next to it. You need it in the next step.
- CPU isn’t listed: drop that board from your shortlist, even if the socket matches.
Do this before the board goes into your cart, not after it arrives.
Step 4: Make sure the board has the latest BIOS updates
This can be tricky for new builders.
Suppose you order a B650 board and a Ryzen 7 9700X. The support list says the board supports the 9700X. But the unit you receive may have been made in 2023 and still be running a BIOS that has never heard of Ryzen 9000. You will only find out when the PC won’t boot.
There are few options to avoid it.
- Check whether the board is newer than the CPU. If a board model is launched after your CPU, every unit of it can run that CPU out of the box.
- Look for the “Ready for” sticker. Many boxes and product listings mention support for a newer CPU series, like “Ready for AMD Ryzen 9000.”
- Pick a board with BIOS Flashback. Treat it just as your safety net in case you have to do a manual update.
Step 5: Match the RAM, cooler, power supply, and the case
Now, it is the time to take the first list that we created at the top and match things to the motherboard.
RAM: Buy the memory type your board supports. DDR4 won’t fit a DDR5 board. For the smoothest experience, pick a kit from the board’s memory QVL (Qualified Vendor List) on the same support page.
Cooler: Check that the cooler lists your socket and that it can handle your CPU’s power figure from step 1. Also check that it fits in your case’s height limit.
Graphics: If your CPU has no integrated graphics, you need a graphics card to see anything on screen.
Power supply: Leave enough headroom for the CPU and graphics card together. The GPU manufacturer’s recommended wattage is a good starting point.
Case: It must support your board size and your cooler’s height.
Once you have picked everything, run the full list through a build tool like PCPartPicker as a final cross-check. I have found it great at catching socket, RAM, and case-size mismatches.
Once you are through all these steps, you should have finalized your motherboard. The main thing is to pick the chipset carefully and memory depending on it. If you get a wrong chipset or the socket for that matter, you can do nothing. Same goes for the memory.
The same process goes for CPU or motherboard upgrades
In case of an upgrade, you should identify your products properly first. If you want to upgrade the CPU and keep everything as it is, you just have to confirm that the motherboard supports it. If you have to do a BIOS update in order to get it running, make sure to follow the official guides and download update files from the manufacturer only.
The CPU model can simply be found from the Windows Task Manager. If you don’t know, the shortcut for opening Task Manager is Ctrl + Shift + Esc.
Go to the Performance Tab and select CPU. You will see the CPU name written on the top.
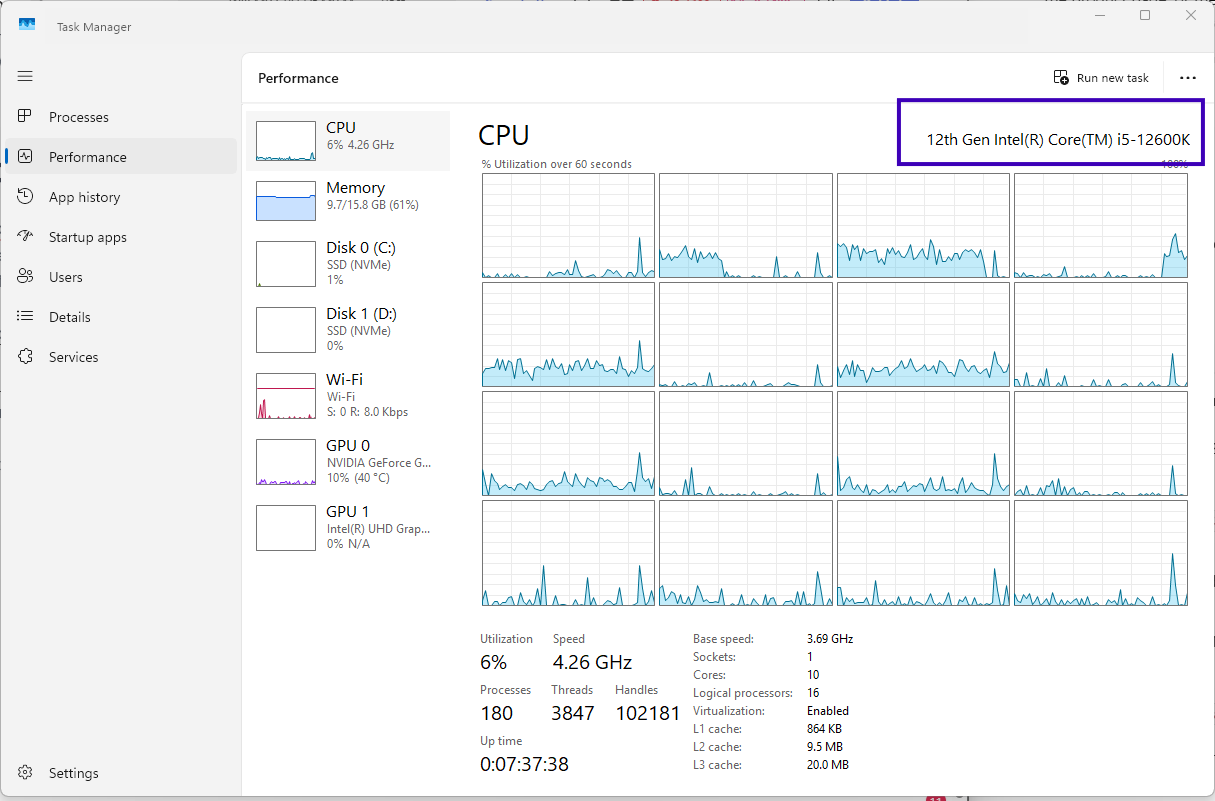
Now, you can follow through the process that we discussed above.
To find the motherboard model, you will have to reach the System Information menu. For it on Windows:
- Press Win + R, type
msinfo32and press Enter.
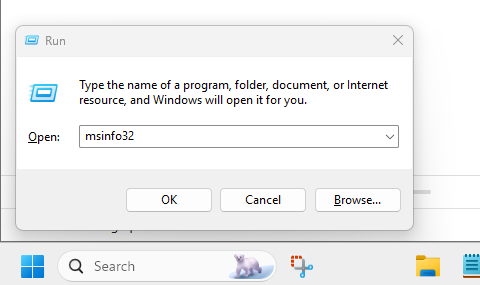
- In System Summary, look for BaseBoard Manufacturer and BaseBoard Product.
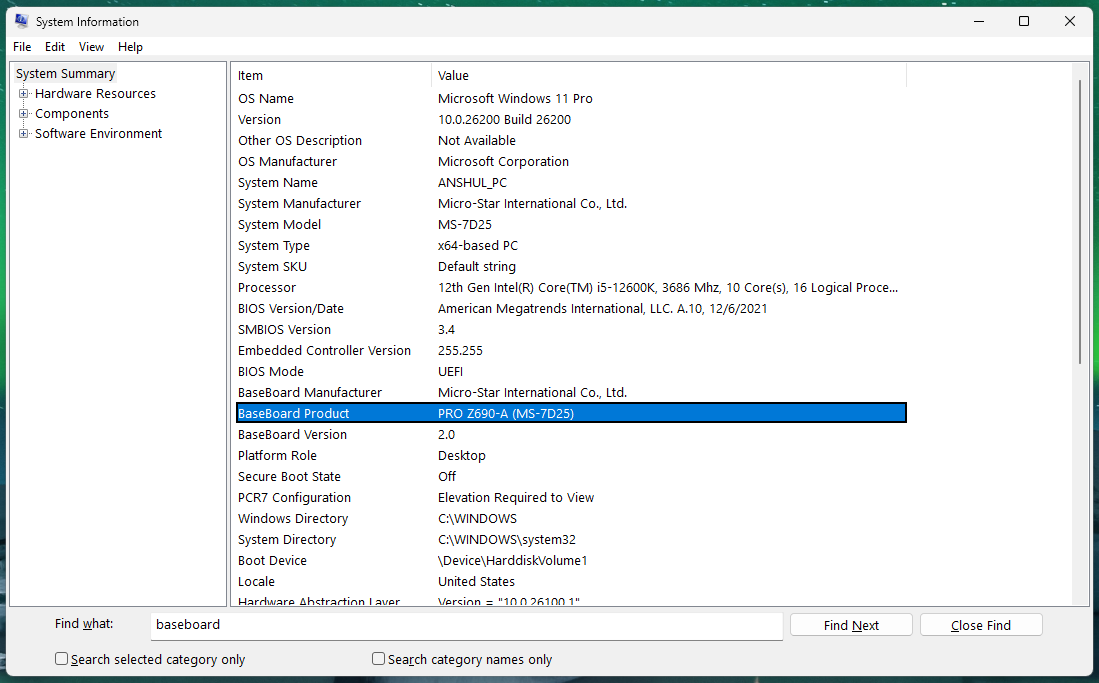
Once you have the motherboard name, you can continue from Step 3 in the process given above.
Keep in mind that when you upgrade the motherboard and want to keep the CPU the same, checking the socket is the first thing. But, you will also have to keep in mind the memory support and other things like SSD generations and speeds given on PCIe lanes.
Conclusion
To conclude this guide, I would say that the socket allows the CPU to get in, the chipset gets it approved, and the BIOS gets it running.
If you remember only one thing, remember the CPU support list. It answers two of the three questions in one place.
Your first goal is to find the chipsets supported by your CPU. Again, if you haven’t decided on the CPU yet, here is the guide. But, once you have finalized it, get the list of chipsets from the official product page and then start the hunt for the best motherboards based on those chipsets.
If you are building a new PC today and care about upgrading later, I would go with AM5. If you plan to keep your CPU until the whole PC is retired, pick whichever platform gives you more performance for your money, and don’t worry about socket longevity.
That’s it.