

Undervolting simply means running your CPU at a lesser voltage than what your manufacturer has decided. For most people, the purpose of undervolting is to reduce heat while keeping the performance same.
Undervolting in itself has nothing to do with the clock speed, but some people may combine overclocking and undervolting together to get a higher performance at a lower voltage. I have discussed everything about overclocking in this AMD overclocking guide.
But I want to clarify one thing before I continue. Undervolting and overclocking are not opposites, and plenty of people run both together. Actually, in Ryzen CPUs, when you enable PBO and raise the boost ceiling, you are already doing both at once indirectly. I will discuss this later when we come to the actual process.
With undervolting we allow the already available Precision Boost Overdrive algorithm more room to operate in higher frequency. In terms of application, undervolting is really very simple if you want to keep it simple. Enthusiasts can take it to extreme levels, but this isn’t what we are going to discuss here.
In short, you undervolt a Ryzen CPU by enabling Precision Boost Overdrive in your BIOS and applying a negative Curve Optimizer offset, then testing that offset until it stops crashing. Start at -10 on all cores, move down in steps of 5, and stop the moment light workloads start throwing errors. On Ryzen 9000, you then refine the result with Curve Shaper.
I have discussed CPU overclocking and power limits before on Hex Hardware. Undervolting sits next to both of them, but it is a different job. So, I am not going to cover fixed manual overclocking here, and I am not going to cover laptops, because AMD laptop BIOSes lock these knobs, and the workarounds deserve their own article. This guide is for desktop Ryzen, including Ryzen 5000 and newer on AM4 and everything on AM5.
So let’s get started.
Why does an undervolt make a Ryzen CPU faster?
Even if you do not play with the multiplier or the clock frequencies, you still get a performance boost just with undervolting.
A modern Ryzen chip doesn’t run at a fixed speed. Precision Boost 2 looks at temperature, current, socket power, and the voltage-frequency curve set on your processor, then picks a clock speed many times per second. It is the curve that tells it how much voltage it will need to run a core, say, at 5.4 GHz at 70°C.
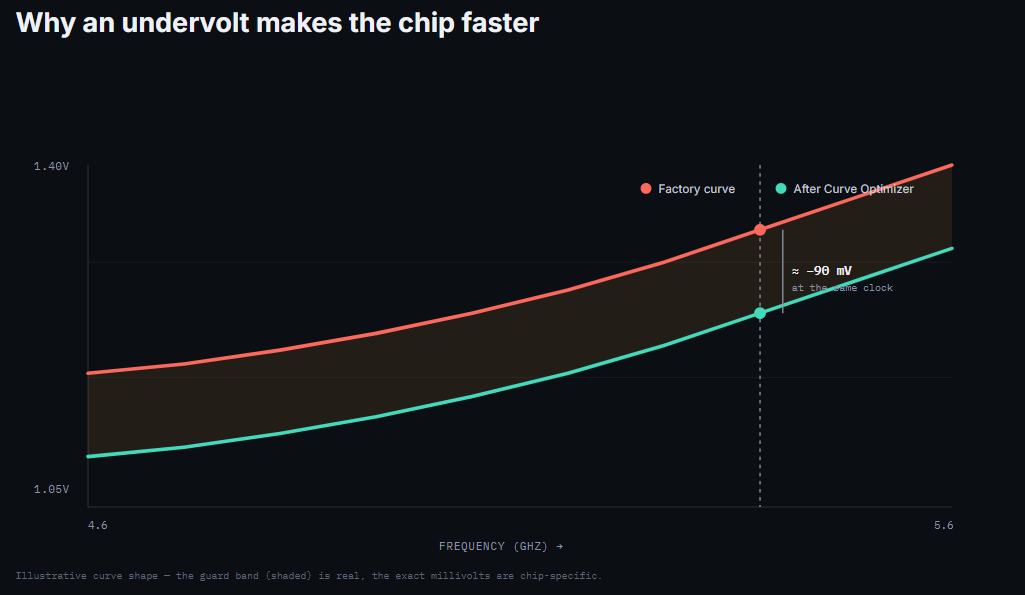
But AMD keeps the curve conservative because it has to guarantee that it works on even the worst ship that passed binning. Your chip is certainly better than the worst case. If not, you will get to know.
When you undervolt, you are telling the chip that it needs less voltage for a given frequency. Lower voltage means lower power, and lower power means lower temperature. PBO looks both at power and temperature before it decides how hard to push the algorithm sees room it did not have before and tries to reach higher clock speeds.
So, technically, with undervolting, you are not gaining performance directly. You get it indirectly by allowing the boost algorithms more thermal headroom.
MSI’s testing of the Ryzen 7 9850X3D found that a -20 Curve Optimizer setting reduced CPU temperature by about 2.6°C, while -30 lowered it by roughly 5.3°C. MSI also reported a roughly 2.5–3% improvement in Cinebench R23 performance. Although the 3% performance gain is nothing you will ever feel, the temperature drop and quieter fan curve are what you notice day to day.
Which Ryzen CPUs can you undervolt?
Not all the Ryzen CPUs can be undervolted, and you have to identify whether yours allows it. If you have a Ryzen 5 3600 and you go into the BIOS and open the Precision Boost Overdrive menu, you will see no Curve Optimizer there. Your board is fine. But, actually, the Curve Optimizer arrived with Zen 3. Therefore, the Ryzen 5000 is the oldest desktop family that can do a proper per-core undervolt. Anything older can only be undervolted the crude way, with a fixed voltage or a global offset.
I have created a table to help you set your expectations right.
| Family | Socket | Curve Optimizer | Curve Shaper | Notes |
|---|---|---|---|---|
| Ryzen 1000 / 2000 (Zen, Zen+) | AM4 | No | No | Manual Vcore or global offset only |
| Ryzen 3000 (Zen 2) | AM4 | No | No | PBO1 plus a negative Vcore offset is your only route |
| Ryzen 5000, 5000G (Zen 3) | AM4 | Yes | No | The classic Curve Optimizer generation |
| Ryzen 5800X3D, 5700X3D | AM4 | Board-dependent | No | See the note below |
| Ryzen 7000, 7000X3D (Zen 4) | AM5 | Yes | No | Per core or all core |
| Ryzen 8000G (Zen 4 APU) | AM5 | Yes | No | iGPU curve can be tuned too |
| Ryzen 9000, 9000X3D, 9950X3D2 (Zen 5) | AM5 | Yes | Yes | The full PBO2 toolkit |
| Threadripper 5000WX and newer | sWRX8 / sTR5 | Yes | Varies | Same method, more cores to test |
| Any Ryzen laptop chip | — | Locked | Locked | Vendor BIOSes block it |
I would first mention the 5800X3D here. It launched without official overclocking support. So, if you are on a B450 or B550 board, you may not see a Curve Optimizer option in the BIOS. However, it is worth doing a BIOS update in case it was added to your board later through AGESA. If your BIOS hides it, the community tool PBO2 Tuner can be used to apply a negative curve.
Secondly, both PBO and Curve Optimizer are AMD AGESA features. They are not offered by motherboard vendors. So, in theory, every board should have the full menu. But, in practice, some vendors trim the PBO submenu mainly for cost-cutting. If yours is missing options, check for a BIOS update before you blame the CPU.
The current state of the Ryzen world
AMD’s desktop stack in September 2026 is still Zen 5.
The Ryzen 7 9850X3D is basically a better-binned 9800X3D with a 400 MHz higher boost clock, so 8 cores, 16 threads, 4.7 GHz base, 5.6 GHz boost, 104 MB of total cache, and 120 W TDP.
The first desktop chip with 3D V-Cache stacked on both chiplets was the Ryzen 9 9950X3D2. It has 208 MB of total cache, a 200 W TDP, and a 270 W default PPT, which is the highest socket power of any AM5 part so far.
Zen 6 is not here yet. And it doesn’t seem to be coming in 2026 in any way.
So, in practice, the chip you undervolt today is a chip you will probably still be using in 2027, and the platform it sits on is not going anywhere. So, spending an evening on a curve is worth a lot more when the result lasts three years.
Before you touch the BIOS
Before we proceed further, I assume a few things.
- First is that your cooler is already adequate and your case has real airflow. Undervolting will reduce the temperature, but it is not a fix for a bad cooling setup at all. If your chip is hitting its limit at stock, read my article on CPU overheating first.
- The second thing I assume is that your memory is stable. Turn EXPO on, validate it separately, and leave it alone during this process.
- Thirdly, your BIOS is current, and you have written down the version number. In case a new AGESA changes boost behavior, you should know what you were on.
- Lastly, you know how to clear CMOS on your board. Find the button or the jumper now. It is your recovery plan when something fails.
The tools you need to install
Here are the tools I use:
- HWiNFO64: To check effective clocks, per-core voltage, PPT/TDC/EDC, and WHEA error counters.
- AMD Ryzen Master (latest version): Applying curve optimizer and Curve shaper live in Windows.
- CoreCycler: To run single-core Primer95 rotation. Important for undervolting and finding a bad core.
- y-cruncher: For mixed heavy loads. It is good at catching a curve that is slightly too aggressive
- OCCT: Generate CPU and memory stress. Easy to use for beginners.
- Cinebench R23/2024: To compare before and after scores.
- Windows Event Viewer: To check WHEA-Logger entries.
Before we proceed, I would recommend you take a baseline.
You just run Cinebench R23 for ten minutes with HWiNFO open and write down four things:
- Cinebench R23 Score (Single and Multi-Core)
- Maximum Package Temperature
- Package Power (PPT)
- The average effective clock across cores.
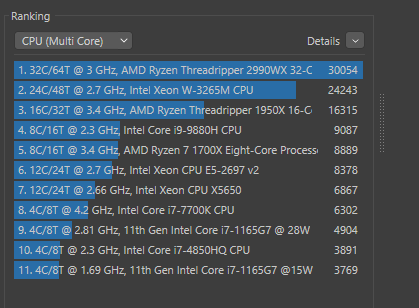
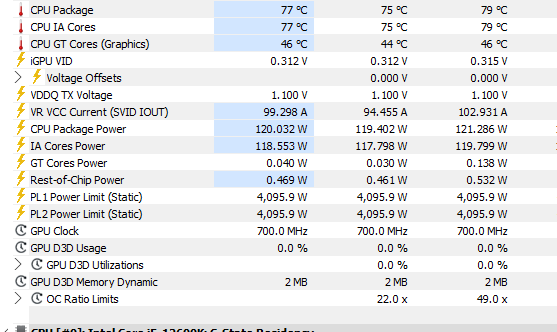
The effective clock is the one that matters, not the reported boost clock. I would also recommend running a single-threaded test and noting the peak core voltage. On most Zen 5 parts you will see something in the 1.3 V region on the lightly loaded cores.
This is your reference. Every change from here will get compared against those four numbers.
How to Undervolt an AMD Ryzen CPU (Step by Step)
1. Open your BIOS
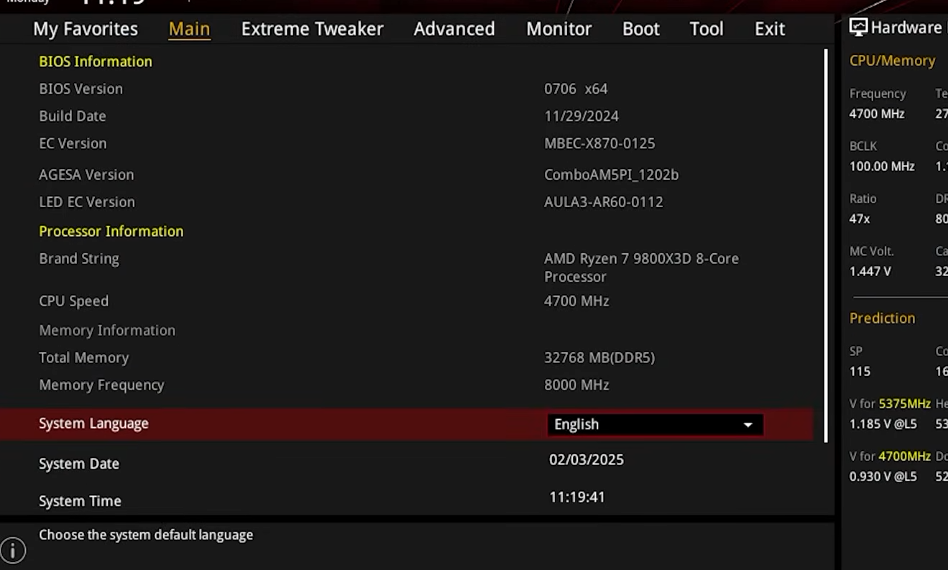
To enter the BIOS, restart your PC and repeatedly press the BIOS/UEFI key as soon as the manufacturer logo appears. The key will vary depending on your motherboard brand. For most boards, it’s the Delete key. However, on others it could be F2, F12, or ESC, etc. You can find it out on the internet or your motherboard’s manual. Just make sure you are at the main BIOS page. It should look something like this.
2. Enable Precision Boost Overdrive
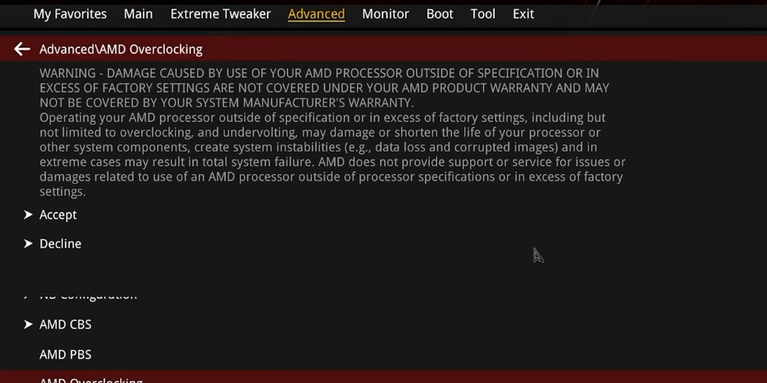
Go to Advanced > AMD Overclocking > Precision Boost Overdrive in your BIOS. You will have to enable AMD overclocking first of all. The exact path will vary, but the menu is an AMD AGESA feature, so it exists on every AM5 board and on most B550/X570 boards.
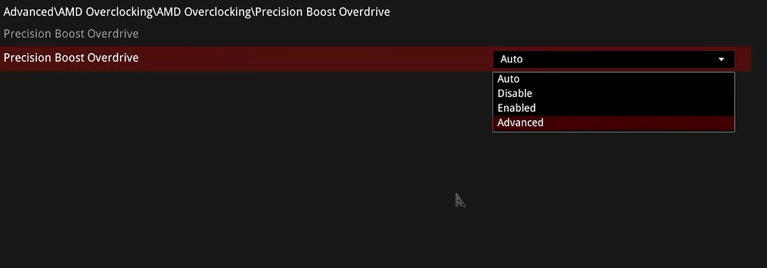
Set Precision Boost Overdrive to Advanced, and set PBO Limits to Motherboard.
Now find the PBO limits options and set PBO limits to motherboard.
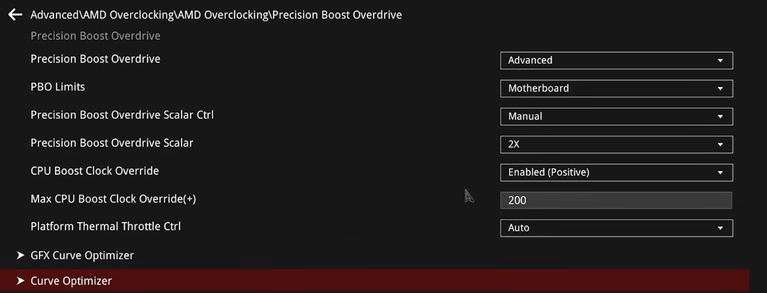
Doing this swaps AMD’s socket power limits for your board vendor’s limits. On chips like 9950X or 9950X3D2, this setting is important. However, on a 9800X3D or 9850X3D, the difference is minimal because these chips are generally frequency-limited rather than power-limited.
Note: It is good not to touch the PBO scalar when doing undervolting, although AMD’s own overclocking guides say to set it to 10x. Scalar raises the FIT (Failures in Time) limit, which is the safety model governing maximum allowed voltage. Setting Scalar to 10X on a 9850X3D pushes the all-core voltage ceiling from about 1.325 V up to about 1.360 V.
Also, leave the CPU Boost Clock Override aside for now. You can add up to +200 MHz later, in 25 MHz steps, once the curve is stable.
2. Set an all-core Curve Optimizer offset
In the same menu, you will find the Curve Optimizer option. Open it.
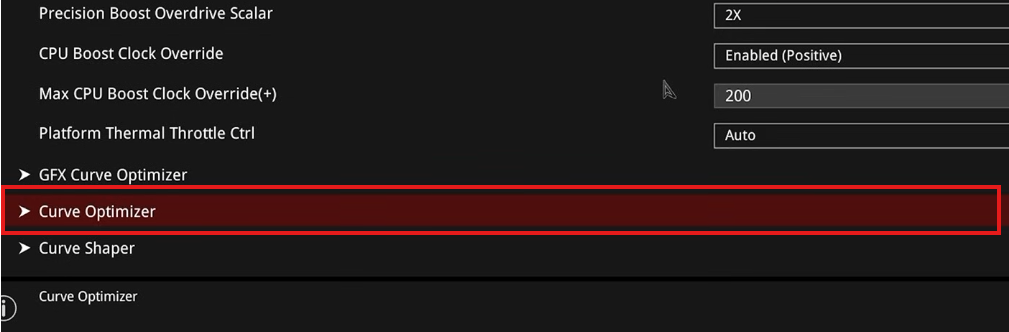
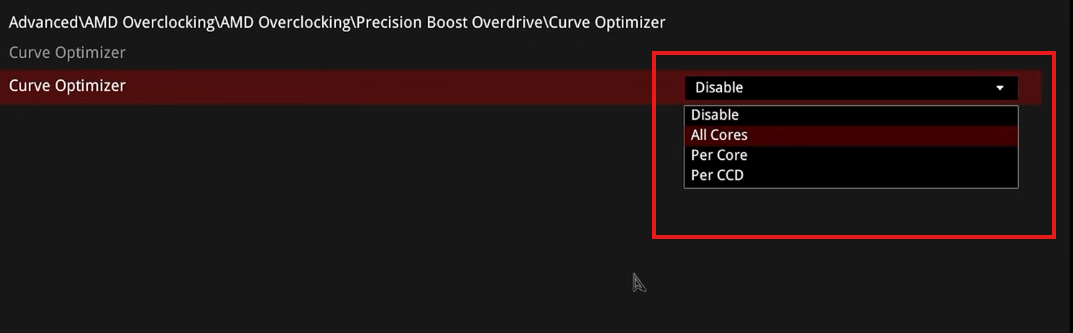
Set Curve Optimizer to All Core. There are other options in the Curve optimizer, but choosing All-core is good to save time. Dialing a per-clock undervolt will require a lot of time and testing, and the results are not that big.
Then, set the sign to negative, and set the magnitude to 10.
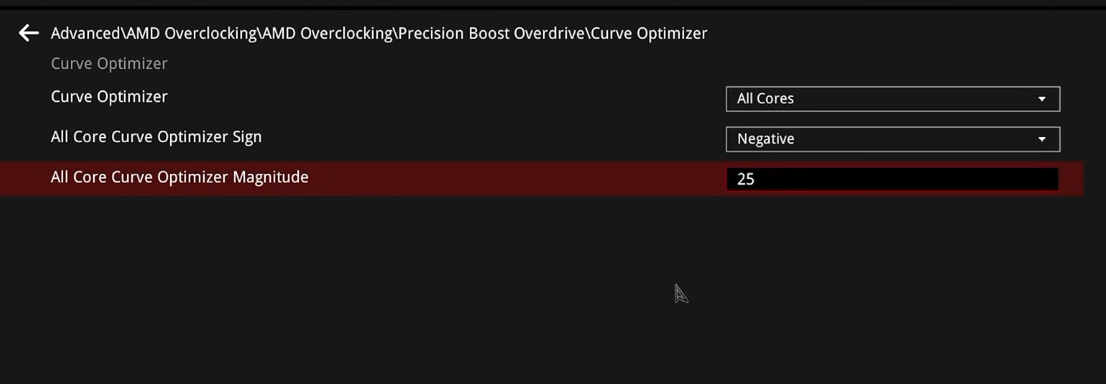
Each step is worth roughly 5 mV, though it is not exact, because you are offsetting a curve rather than dialing a fixed voltage. On Ryzen 9000 you can apply the offset per core, per CCD, or across all cores.
What is happening with the negative curve optimizer?
When you set a negative Curve Optimizer magnitude, you are shifting the CPU’s voltage/frequency curve downward. For example, you set the curve optimizer magnitude to -10. The CPU attempts to reach its various frequencies with less voltage than it would normally use. If you increase it to -20, you are asking for a more aggressive reduction. This negative offset value is a measure of how aggressively you are asking the CPU to shift its voltage/frequency curve downward. They are not the values saying “reduce voltage by 10 mV or 30 mV. “They are Curve Optimizer units.
However, if you set the negative value too large, you are basically asking the CPU to operate at an insufficient voltage. Again, this will vary depending on your CPU because not all CPUs are the same. This is where you will face instability with signs like crashes, reboots, application errors, or WHEA errors. When you face this, you just go to the previous value, which was stable.
Most BIOSes will allow you to go to -30. Plenty of boards accept -50 or even -60. But whether AGESA actually encourages anything past -50 has been argued about for years. I could be wrong here, but I have never needed to find out. In my opinion, if your chip is stable at -40 on every core, you already won.
3. Move to per-core offset (if required).
All-core undervolt that we discussed above is easy, almost safe, and beginner-friendly. But there is a catch in it. It is limited to your weakest core. So, once you find your stable all-core value, switch Curve Optimizer to Per Core and start pushing individual cores further.
Your two best cores, the ones marked with a star or a dot in Ryzen Master, are usually the least tolerant. Give them less. The remaining cores will often take -5 to -15 more than your all-core value. It becomes important when you encounter instability. In this case, you can switch to Per Core and reduce the negative value on the problematic core while keeping stronger cores more aggressively undervolted.
Honestly, this step takes hours, and if you do not want to do that, stop at all-core. You will still keep about 80% of the benefit.
4. Refine with Curve Shaper (Ryzen 9000 only)
I said 9000 because Curve Shaper is a relatively newer feature added in the Zen 5 chips within the PBO2 toolkit. It sits on top of the Curve optimizer rather than replacing it.
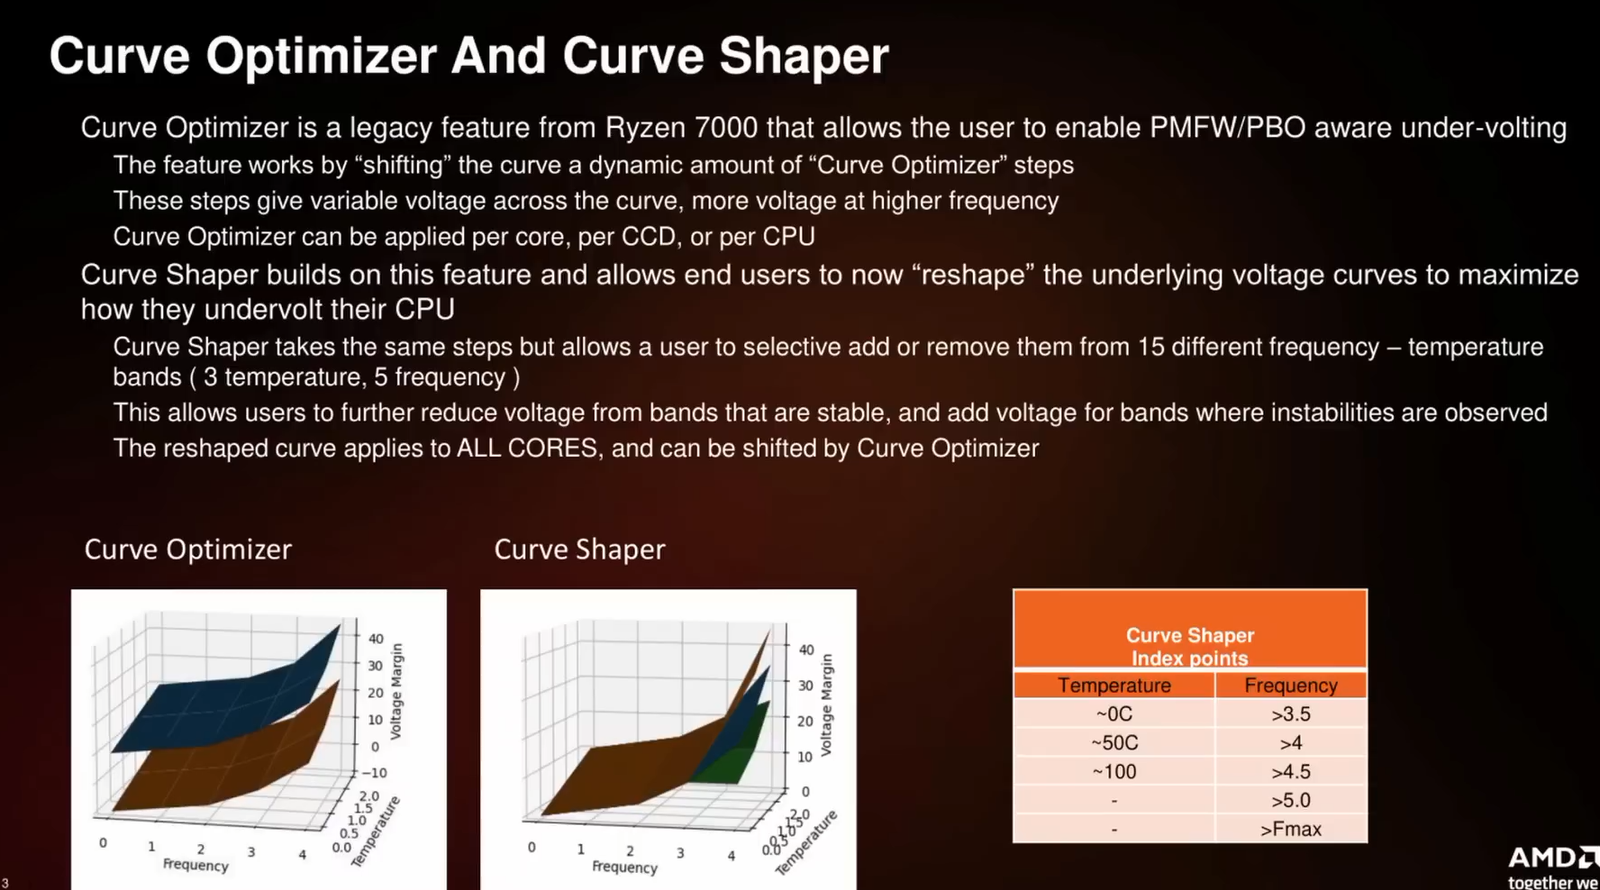
While the curve shaper shifts the whole curve downwards, the curve shaper lets you shift parts of it. You get 15 tuning points, arranged as five frequency regions (low, medium, high, and so on) crossed with three temperature points (low, medium, and high).
But what does that mean for you?
Basically, the Curve Shaper is for enthusiasts who have already tuned their Ryzen CPU with Curve Optimizer. It goes really deep into the fine-tuning part. So, for example, your chip may have a good enough room at 4.8 GHz and almost none at 5.6 GHz. With Curve Optimizer alone, the tightest point on the curve sets your limit for the entire curve. With Curve Shaper, you undervolt hard where there is margin and leave the tight region alone.
What is a voltage/frequency curve?
Every Ryzen chip leaves the factory with an inbuilt table that says it “is to run at this frequency at this much voltage.” Plot that table and you get a curve. Precision Boost 2 reads it thousands of times a second to decide how hard to push.
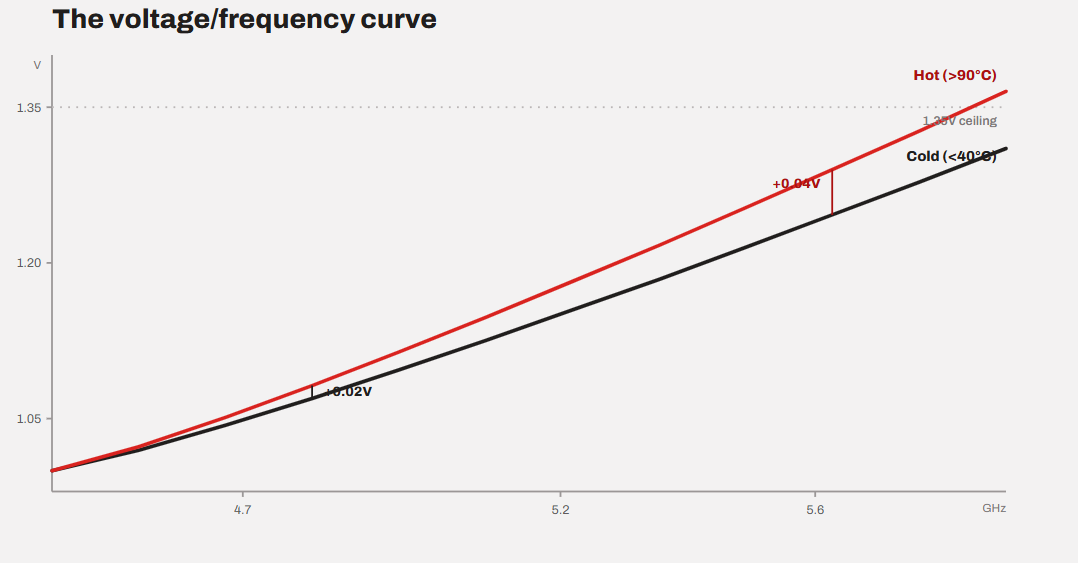
Now, there are two rules that govern that curve.
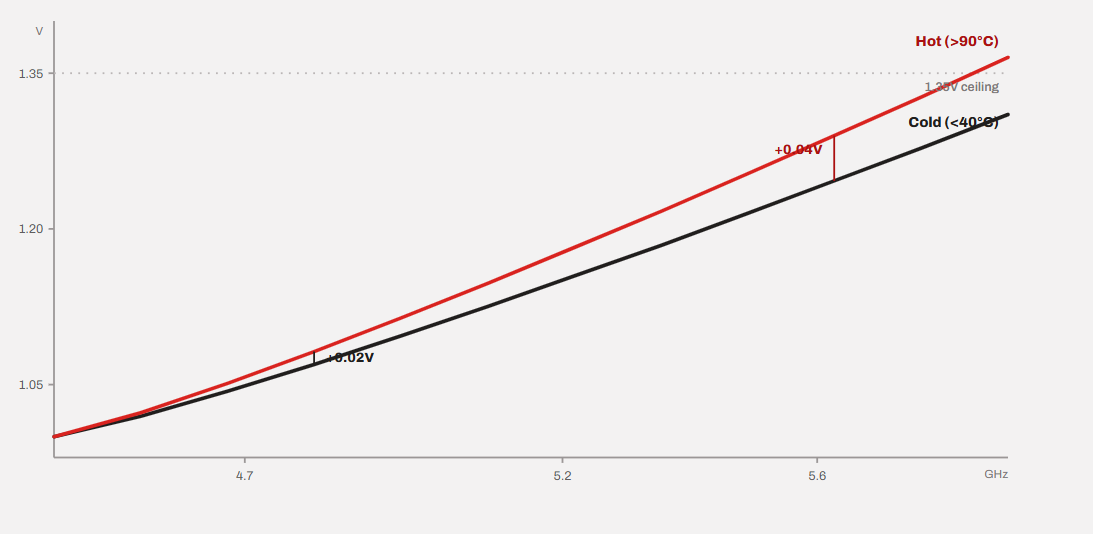
Rule one: a higher frequency needs more voltage. For example, on a Ryzen 9 9950X, one CCD needs around 1.05 V to hold roughly 4.7 GHz, but it needs about 1.35 V to go past 5.6 GHz.
Rule two: a higher temperature needs more voltage for the same frequency. The same chip at about 4,766 MHz wants 1.06 V when it is under 40 °C and nearly 1.08 V when it is over 90 °C. At 5,165 MHz the gap is wider, 1.11 V cold against 1.158 V hot.
So the curve is not one line. It is a line that also moves depending on how warm the chip is. Keep that in your head, because Curve Shaper exists precisely because of these two rules.
So what does Curve Shaper change?
We discussed that the curve optimizer picks up the whole curve and shifts it. Set -30 on that same 9950X, and the voltage needed for 5 GHz drops from about 1.08 V to 0.995 V.
But the curve shaper doesn’t shift every part of the curve by the same amount. That -30 was worth more than an 11% voltage reduction above 5.6 GHz, but only about 8% down at 4.7 GHz.
Curve Shaper gives you 15 tuning points instead of one number. Five frequency regions (from low up to maximum), each with three temperature points (roughly cold, around 50 °C, and around 90 °C). I have made mock graphs to help you understand better.
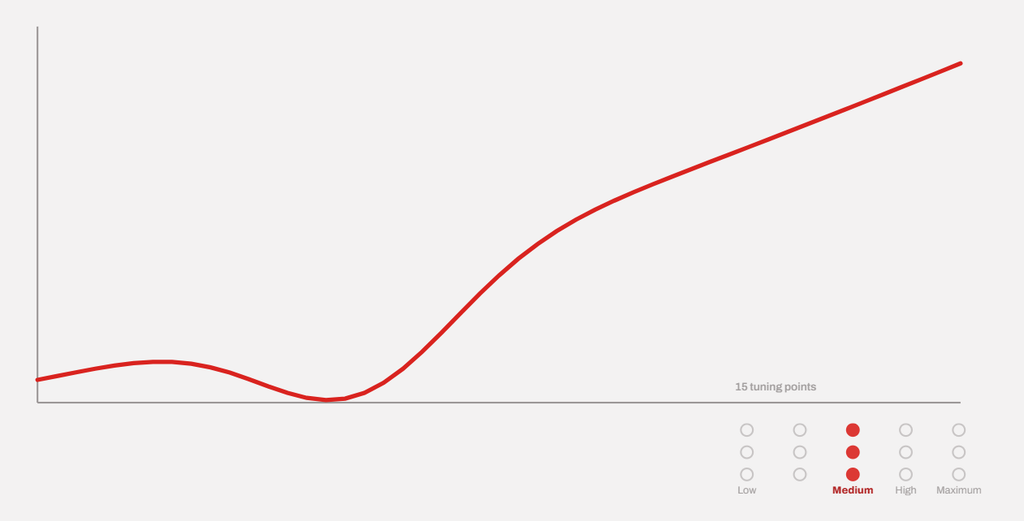
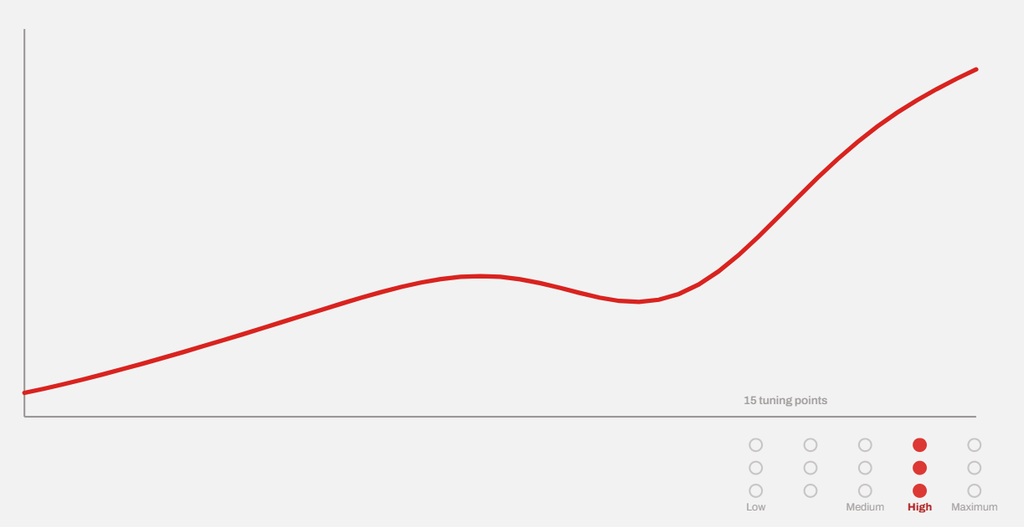
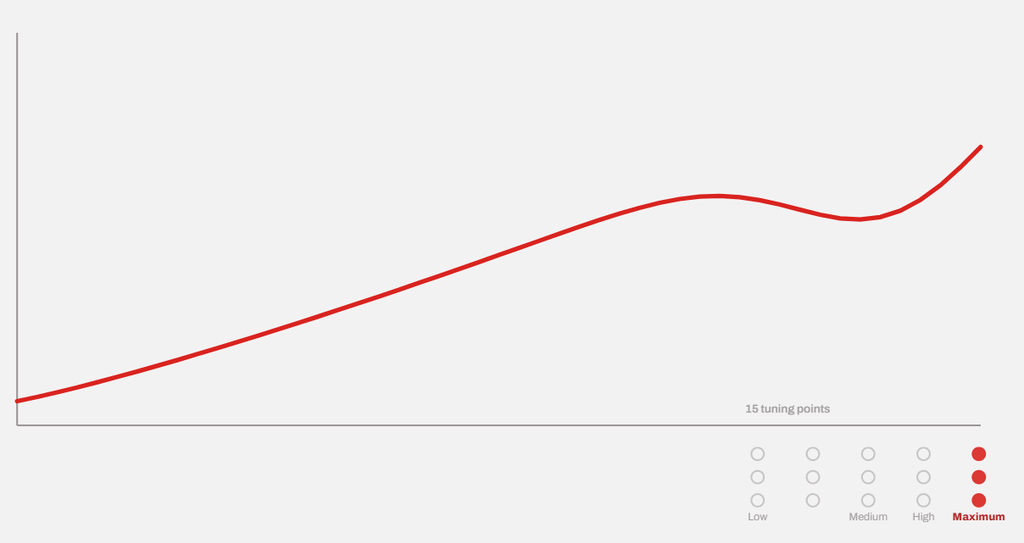
Think of the curve as a wire stretched across your screen. Curve Optimizer grabs the whole wire and drags it down. Curve Shaper lets you press a finger on it at one spot. The wire bends most right under your finger and less as you move away, and the far end barely moves at all.
For example, let’s say you want to undervolt in the high-frequency region for temperatures between 50 and 90°C. This would be a great approach to increase the operating frequency in the gaming workloads. However, it isn’t that simple. Let’t talk about it more.
The shaper points are not fixed frequencies. They move with your chip. On that 9950X, one CCD has a maximum frequency of 5,750 MHz and the other 5,450 MHz, and the whole shaper pattern shifts by that same 300 MHz between them.
Inside the BIOS, you will get 15 additional tuning points with the Curve shaper. Here are how they look.
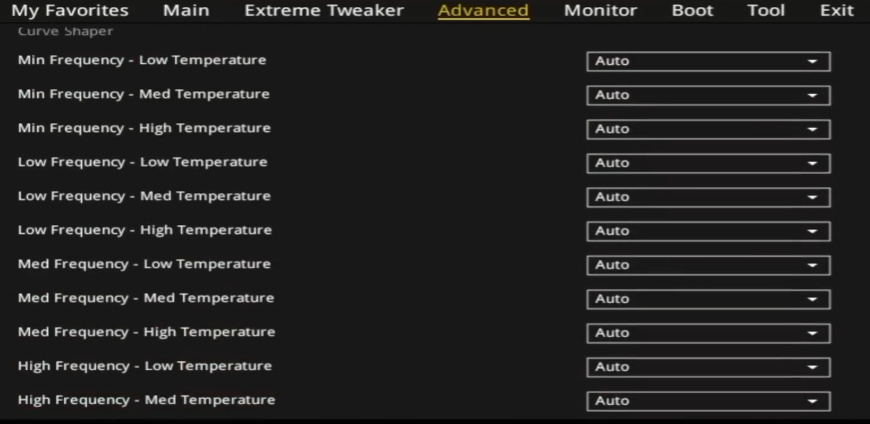
But there is an issue. The Intel Precision Boost technology doesn’t really work with the V/F points. So, instead of getting a list of tunable points, we get five regions and three temperatures. See the image below.
Curve Shaper in Practice
Let’s start by setting the -30 curve shaper for all temperature points at max frequency.
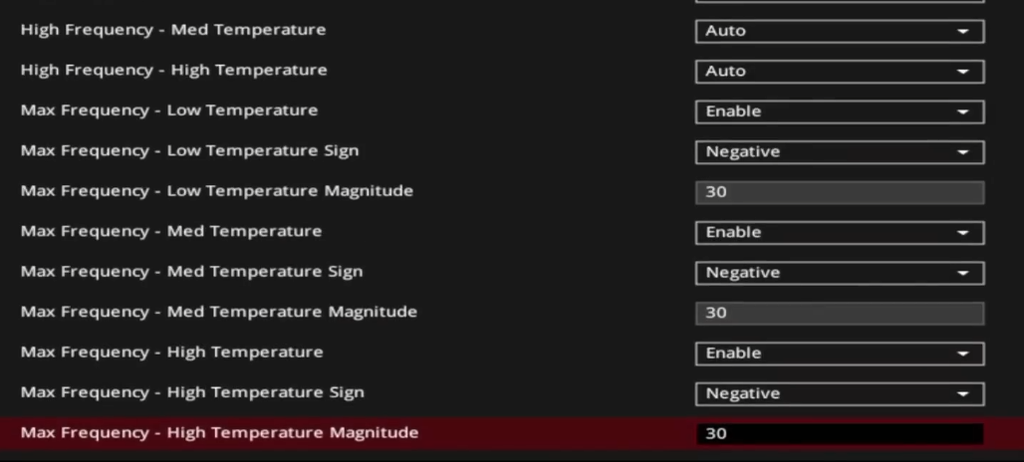
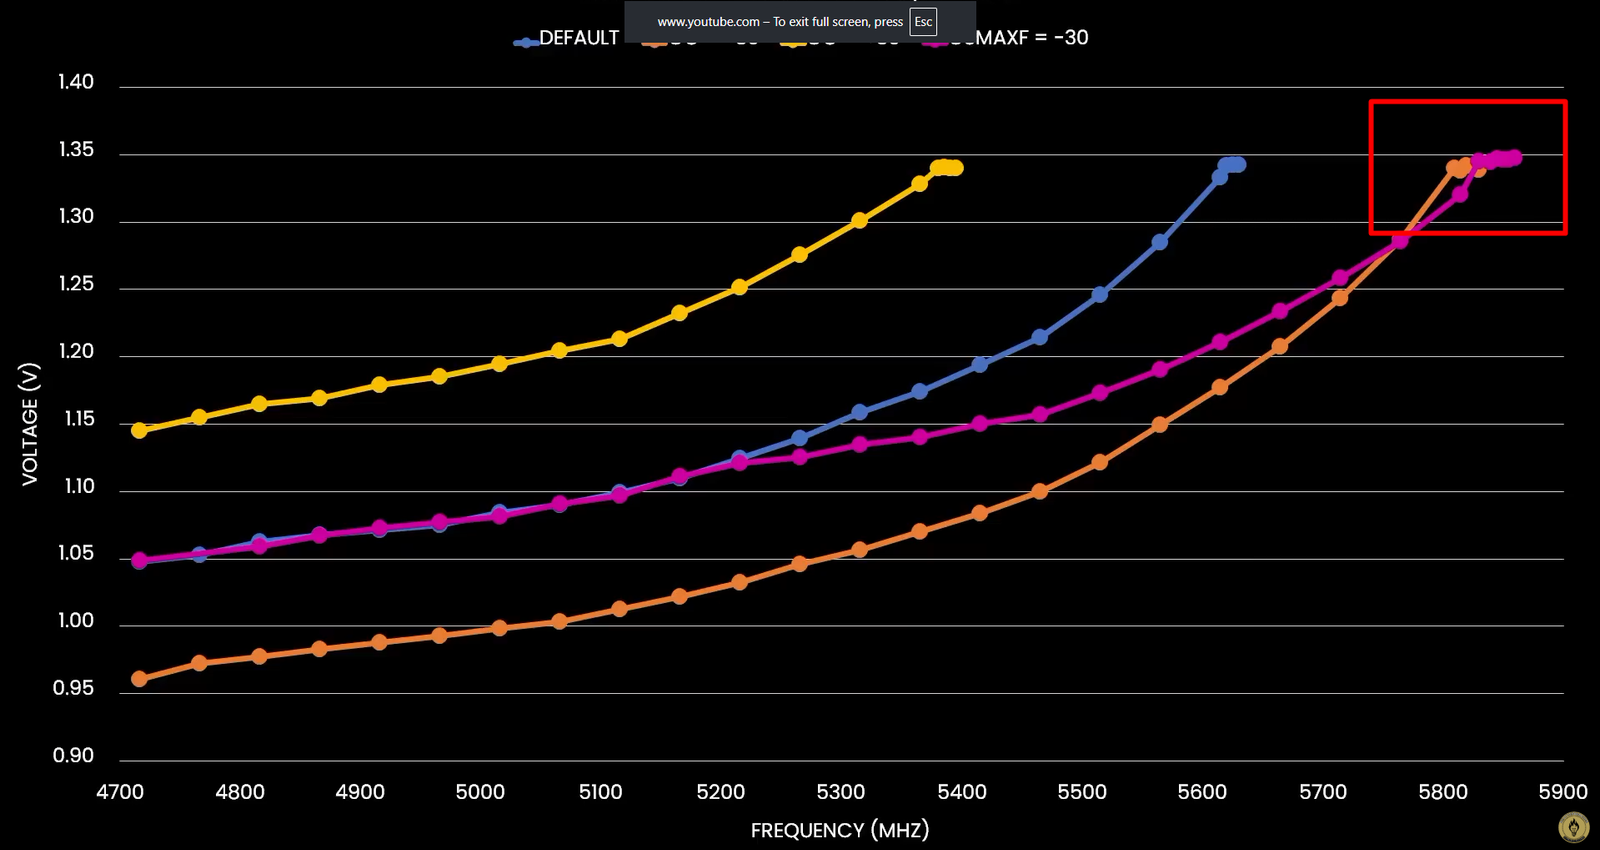
What this does is it adjusts the voltage/frequency curve at the very end of the curve (near the maximum frequency). You can see the screenshot below from Scatterbench. The main thing to notice is that the voltage below around 5200 MHz is unaffected by this undervolt.
Now, let’s try to set a -30 curve shaper for all temperature points at high frequency.
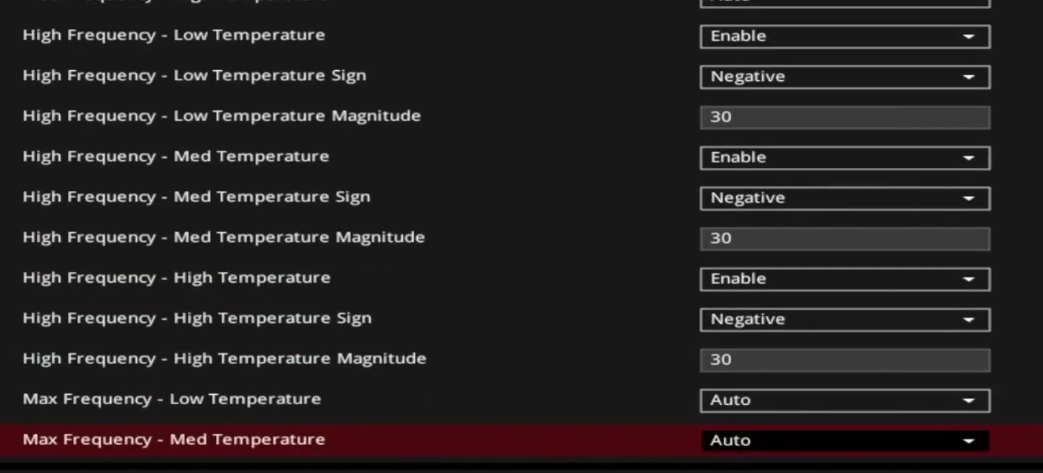
In this case, the V/F curve adjustment happened much earlier.
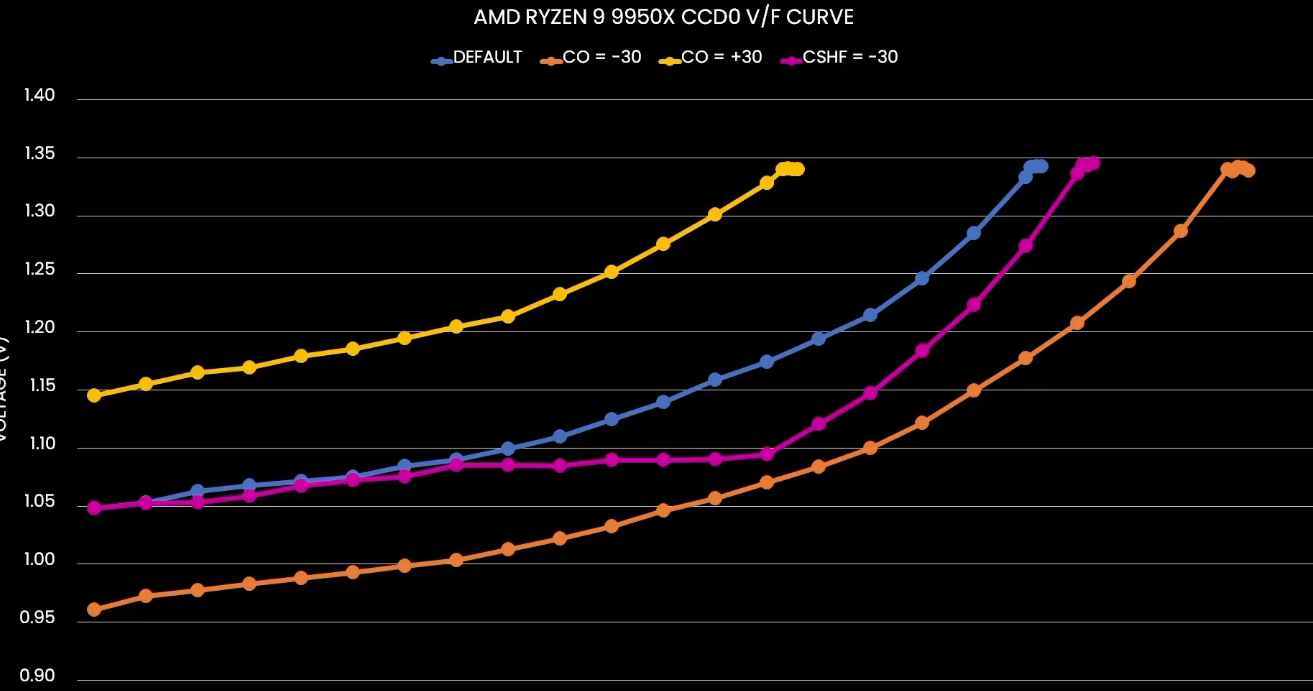
Similarly, if we now try to set the same negative offset to all temperature points at medium frequency, the curve will be adjusted very early in the curve.
Again, this is really advanced stuff, and you should play around with the curve shaper. You know what you are actually doing. I may post a dedicated curve shaper guide later on hexhardwar. For now, let’s move further.
5. Use Eco Mode or manual limits instead (the lazy option).
If you want most of the efficiency with none of the testing, skip the curve entirely.
Set Eco Mode in BIOS or Ryzen Master, or set PPT/TDC/EDC manually to a lower value. A 105 W PPT on a 9950X gives up a few percent of multi-threaded performance and cuts power dramatically.
How do you know the undervolt is actually stable?
You have to run these tests in the given order.
- CoreCycler, Prime95 SSE and AVX2 profiles, one core at a time, for at least two hours. This is the single best test for a bad Curve Optimizer value.
- y-cruncher, the standard stress test, for a few hours.
- OCCT, CPU + memory, one hour.
- Idle and light use, for at least a week, with HWiNFO running.
During these tests, you need to watch for the symptoms like rebooting and freezing. Check WHEA-Logger entries in Event Viewer, especially Event IDs 18, 19, and 47. HWiNFO also counts WHEA errors directly. You can also find that a single core has a failure in CoreCycler while the rest pass. Back that core off by 5 and retest. For more on how to use this software, check out this article.
Conclusion
There are four decisions you will have to make in order to get a successful undervolt.
Turn PBO on, pick an all-core negative offset, test it properly, and then decide whether per-core and curve shaper are worth your time.
If you want to hear my suggestion, I would set PBO to Advanced with motherboard limits, run all-core Curve Optimizer at -15 to -20, leave Scalar and boost override alone, and spend the time on stress testing. This will help you get most of the temperature drop with very little of the risk.
I hope this helps.