

Overclocking Safety and Warranty Guide
In our beginner’s guide to CPU overclocking article, I promised a detailed AMD overclocking guide, and this is it.
Ryzen overclocking has completely transformed modern CPUs. Earlier, it was about setting a fixed voltage and providing appropriate voltage. Now, it is more about optimizing the settings in a way that AMD’s boost algorithm is still in charge and you have simply given it more room to work.
AMD’s Precision Boost Overdrive and Curve Optimizer do the same thing for you, and this is what most of this article is about. I will still discuss manual overclocking, memory tuning, X3D chips, and what to do in case of crashes. So, let’s get started with it.
But, before getting started, I would say that there is no universal frequency or voltage that I can provide for a specific CPU. Overclocking is all about experiments and also how lucky you are. Not all processors are the same, and it is possible that two exactly the same ones perform differently even after overclocking. However, AMD overclocking is much easier and more straightforward than Intel.

The Precision Boost + PBO + Curve Optimizer approach works best for most people and is a great starting point for most beginners. As compared to Intel’s P-Core and E-Core adjustments, core voltage, load-line calibration, and power limits, AMD offers much simpler overclocking opportunities to its users.
Rather than telling a Ryzen 7, for example, “Run every core at 5.2 GHz,” you can apply a negative curve offset and allow Precision Boost to determine the appropriate frequency. It might sound too technical, but I promise, by the end of this article, you will understand everything that you need to know to overclock your CPU safely.
What do you need before touching anything
1. A current BIOS
Go to your motherboard’s manufacturer’s support page and flash the latest stable release. AGESA updates change boost behavior, voltage handling, memory compatibility, and Curve Optimizer stability. An old BIOS will waste hours of your time chasing instability that was simply fixed in firmware months ago. After you update the BIOS (and chipset driver if you can), load optimized defaults.
2. Good cooling setup
Overclocking is not just about increasing the core clock and providing it just enough voltage. Temperature is a very important parameter. You can’t overclock your CPU just to hit throttling and then come back to an even lower clock than its boost. The idea here is that if your CPU is hitting its thermal limit at stock, you have nothing to overclock. Overclocking can’t fix a bad cooler. Rather, it exposes it.
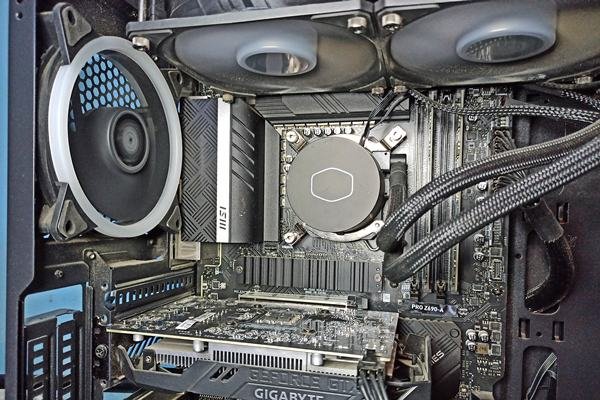
A 9950X working at 200W or more needs a strong 360mm AIO or a serious air cooler, and there is no substitute for it. If you do not know where you stand, read this CPU overheating article first.
3. A good motherboard (with VRM that can keep up)
I have said it in the beginner’s overclocking guide, and I am saying it again. VRM matters more than you think when you overclock. VRM quality limits you more than the chipset does on modern boards. A good B650 board will beat a cheaper X670E board every single time when it comes to sustaining heavy load tasks. In overclocking, this matters more.
4. Monitoring and testing software
- HWiNFO64 for temperatures, effective clock, package power, and core VIDs
- AMD Ryzen Master for best-core identification and Windows-side tuning
- OCCT and Prime95 for load testing
- Cinebench 2024 and y-cruncher for performance and validation
- CoreCycler for per-core Curve Optimizer testing
- Windows Event Viewer, which is free and already installed
5. The recovery plan
Know where your CMOS reset button or jumper is before you need it. It is possible that you need it.
Know exactly what your chip allows
As the popular consensus, not all Ryzen chips allow you the same control. In some chips, there can be restrictions. This is what the modern Ryzen line-up looks like for overclockers.
| Chip type | Manual multiplier | PBO | Curve Optimizer | Notes |
|---|---|---|---|---|
| Non-X (9600, 9700) | Yes | Yes | Yes | Lower stock power limits, so PBO often gives the largest gain |
| X models (9600X, 9700X, 9900X, 9950X) | Yes | Yes | Yes | Full toolkit, plus a 105W TDP mode on the 65W parts |
| Zen 5 X3D (9800X3D, 9850X3D, 9600X3D, 9950X3D) | Yes | Yes | Yes | First X3D generation with official overclocking support |
| Older X3D (5800X3D, 7800X3D) | No | No | Negative only | Multiplier locked, positive voltage offsets blocked in BIOS |
| Ryzen Pro, OEM, and mobile | Usually no | Varies | Varies | Check the spec page; many list “Unlocked for Overclocking: No.” |
If you have Ryzen 9 parts, keep in mind that they have two core complex dies, and each CCD has its own maximum frequency. They are not identical. One CCD is usually the better silicon. On the 9950X3D, only one CCD carries the extra cache.
The last thing before you start: Get a Baseline
Before you change a single thing, I would recommend you measure your starting point. Cinebench and HWiNFO would be enough for this. You go something like this:
- Cinebench 2024 multi-core and single-core scores (compare them later to compare overclock benefits)
- Peak package power during that run, from HWiNFO
- Peak core temperature during that run
- Average effective clock during that run, not the reported clock
- If you game, a 10-minute run in something CPU-heavy with FPS and 1% lows recorded
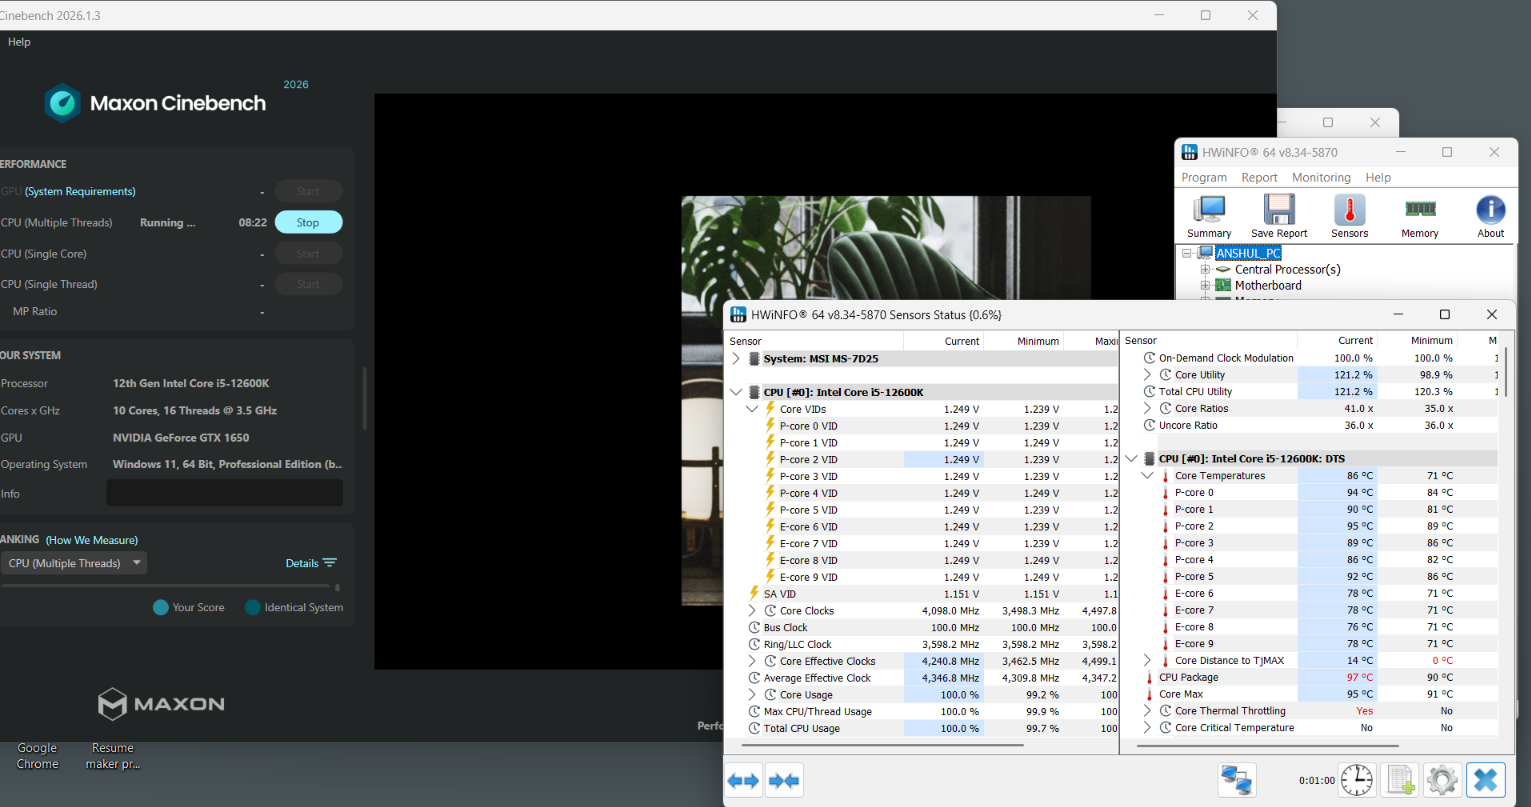
Just look at the effective clock, not the clock speed that Windows reports. The task manager will happily show you 5.4 GHz while the core is idling half the time. You just look at HWiNFO’s effective clock that tells you what the core actually did.
Step 1: Start with PBO
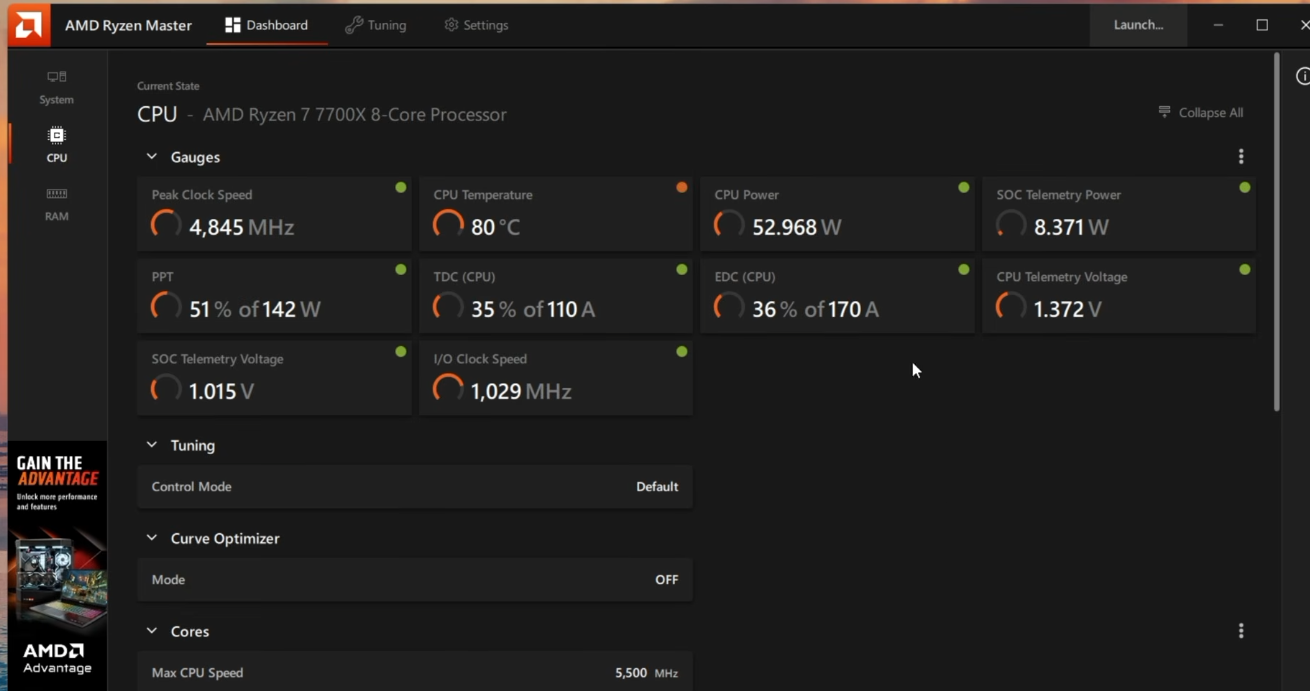
Your first help is the Precision Boost Overdrive. This is what your initial dashboard would look like.
To find the PBO settings, you have to go to the tuning section.
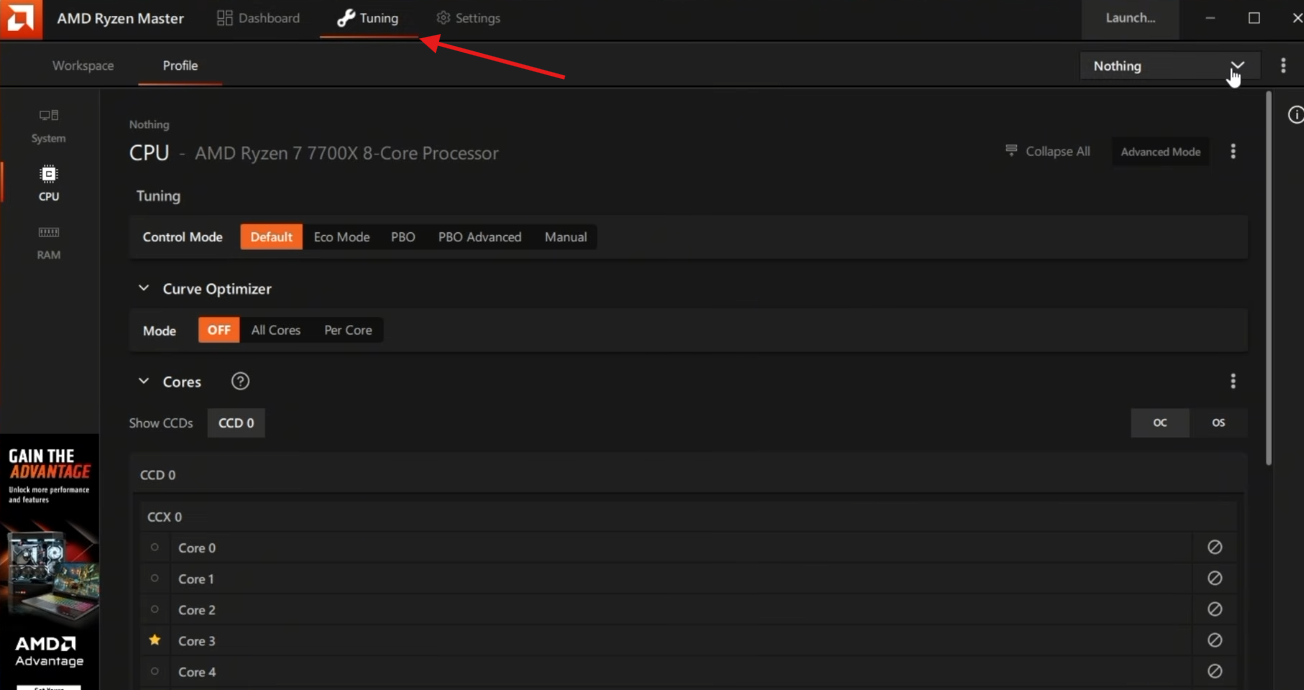
In the control mode, you select PBO Advanced.
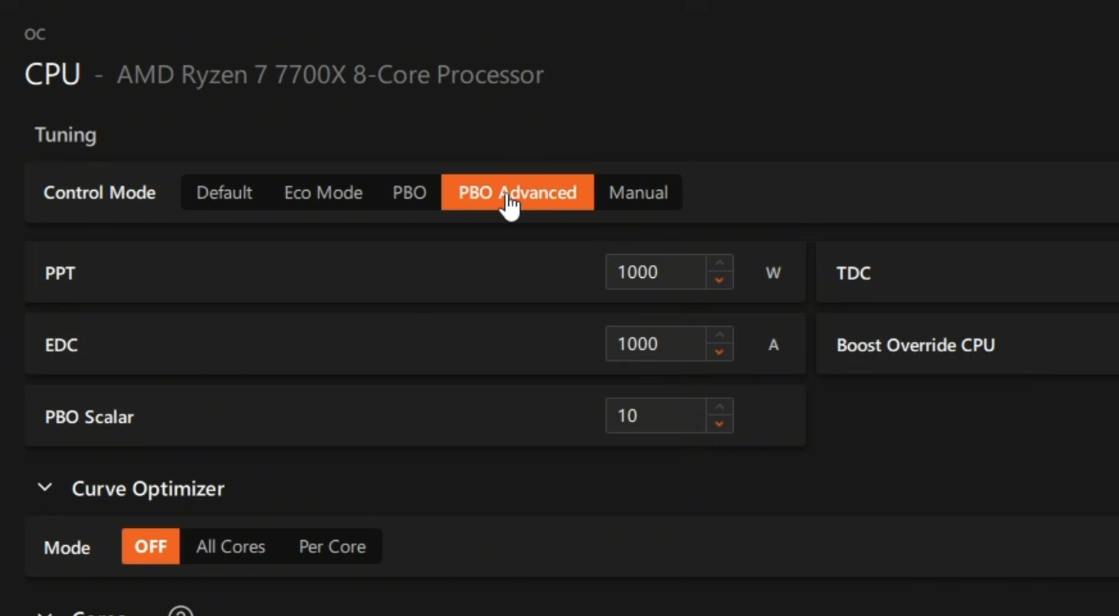
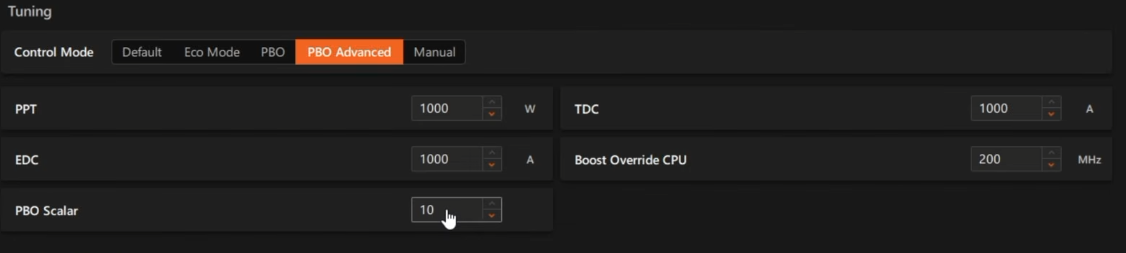
The first section that you see is mainly related to the CPU power, including PPT, EDC, and TDC. All three of these will be maxed out at 1000. So, keep them just like that. The last setting, i.e., Boost Override CPU, will also be set at 200 MHz. If not, set it to max. PBO Scaler should also be set at maximum, which will be 10.
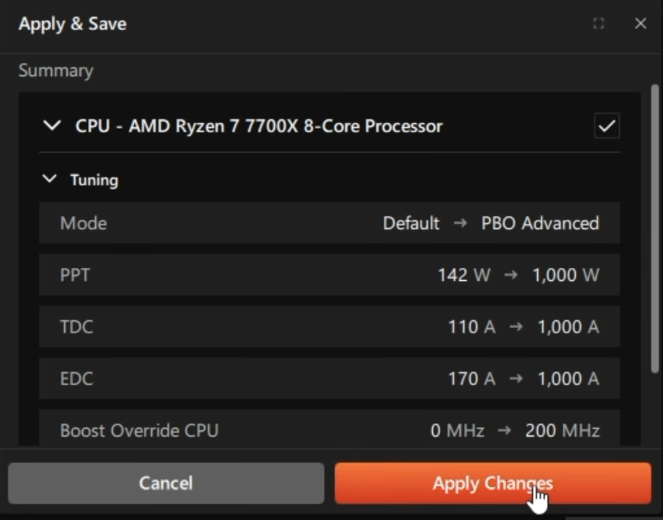
Hit Apply and save the changes.
Make sure you go to the settings menu and enable the PBO to BIOS toggle. This will save the changes from PBO to BIOS so that they load everytime by default with every boot.
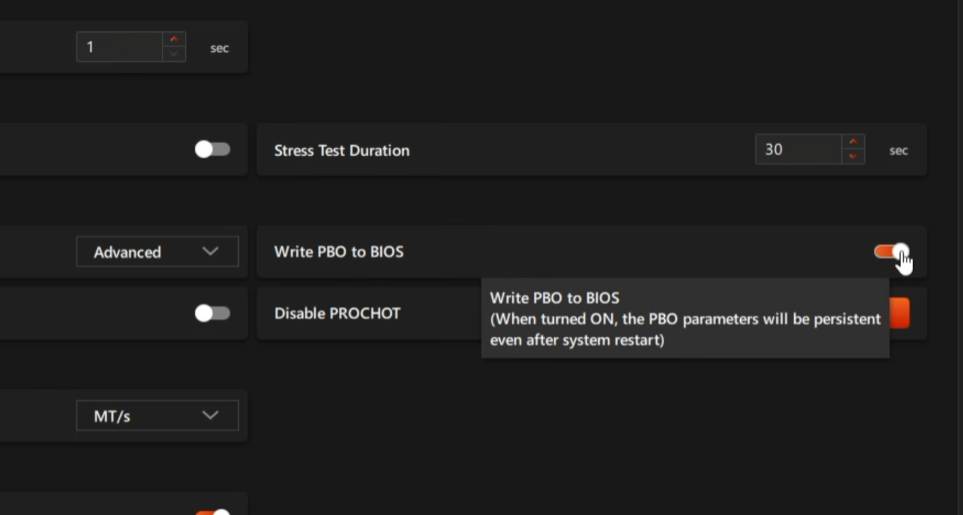
That’s it. Now, the PBO is going to reach the maximum possible performance in the safe limits. However, if you want, you can go for manual overclocking.
Manual Tuning and Undervolting
With manual overclocking, your processor loses access to boost algorithms entirely. This means you lose the single-core spikes to 5.6 GHz or higher that the chip was doing for free. You gain a slightly higher all-core frequency under sustained multi-threaded load. And you now hold a fixed voltage at idle, so your chip sits at 1.2V doing nothing at the desktop. With manual settings, you are going to be fully responsible for where you will take your CPU. The risks are also higher. You have to manage the voltage yourself and keep temperature under control.
Community results on Zen 5 land around 5.3 GHz at about 1.22 V for a stable daily all-core. Anything meaningfully above that starts needing voltage that puts Cinebench temperatures into the 90s.
So, what do you get from all this?
Basically, you trade away all your single-core peaks for maybe 100 to 200 MHz on all-core, and you pay for it in idle power and heat. For gaming, which lives on single-thread performance, that is a straight downgrade.
However, manual overclocking makes full sense when your machine runs sustained all-core workloads and nothing else.
We can perform a manual overclock with the Ryzen Master, but I am going to use the BIOS because if you want to perform a good overclock, I believe the way goes through the BIOS.
Step 1: Enter BIOS/UEFI
On Windows, you can click the Restart button while holding the shift key. You can enter the BIOS menu by pressing the ESC, Del, F11, or F12 key on the keyboard. It varies according to your motherboard. The BIOS/UEFI settings will also vary, but you can always find the settings we go through in this guide in your specific one. I am using the Asus motherboard, but you will find these settings in all other brands as well.
Step 2: Enable AMD overclocking
Just go to the Advanced menu and enable AMD overclocking.
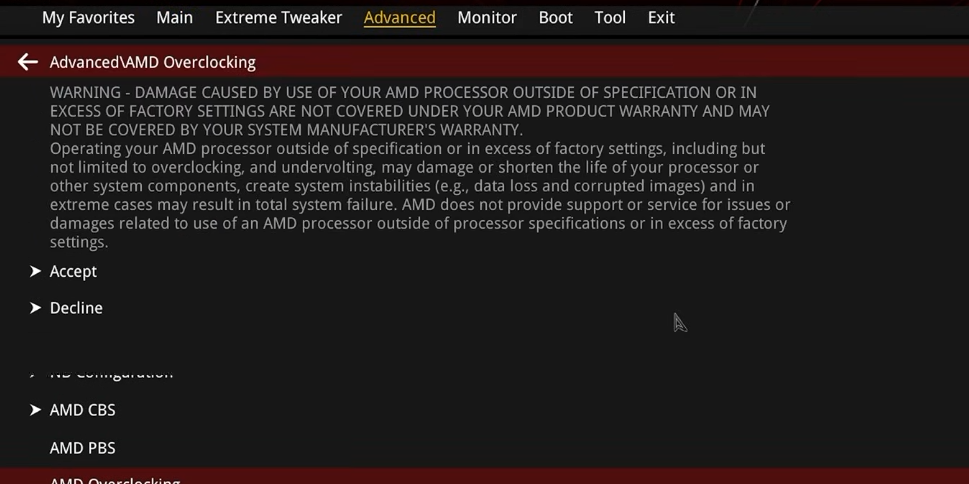
Step 3: Change PBO settings
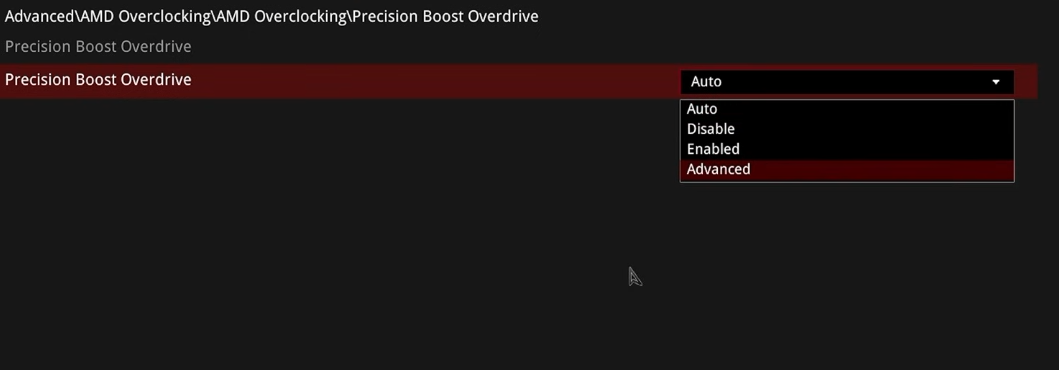
Inside the advanced menu itself, you will find the Precision Boost Overdrive option, and you have to open it. Set the PBO mode to Advanced.
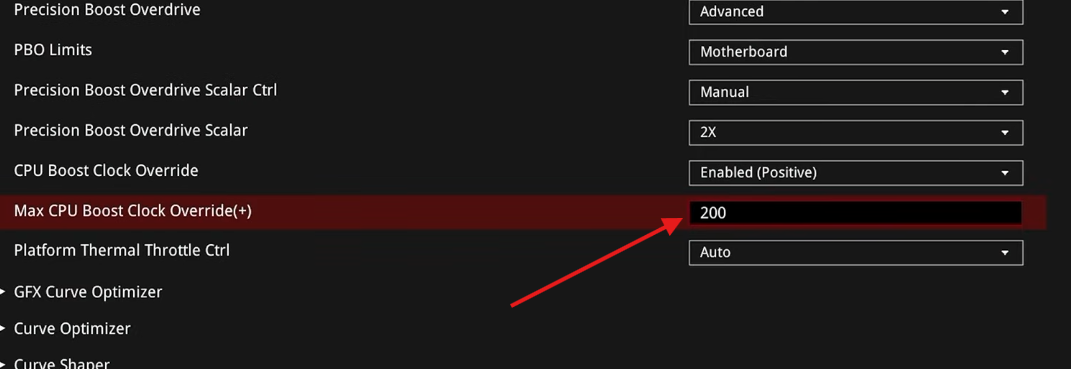
Now, you get settings to adjust PBO limits, PBO Scalar Ctrl, CPU Boost Clock Override, Platform Thermal Throttle Ctrl, etc. I would recommend you change these settings like this.
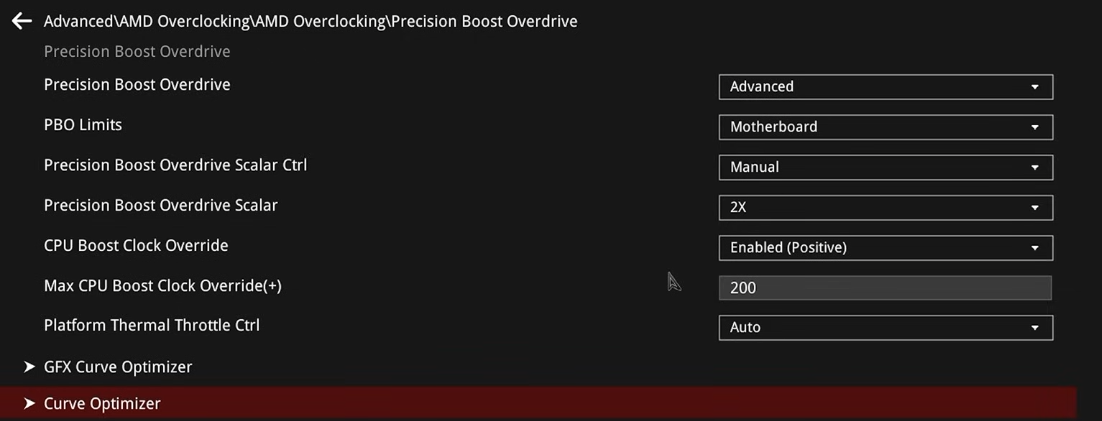
We will talk about this 200 MHz limit later on.
Step 4: Curve Optimizer (for undervolting)
Next, you head to the Curve optimizer option from the same menu. The purpose of using a Curve optimizer here is to change the CPU’s voltage/frequency curve so Ryzen can operate more efficiently. On modern Ryzen CPUs, Precision Boost dynamically chooses the frequency and voltage based on workload, temperature, power, current, and other limits. We generally set a negative Curve Optimizer value and make a core achieve a given frequency with less voltage. This mainly helps with reducing the temperature.
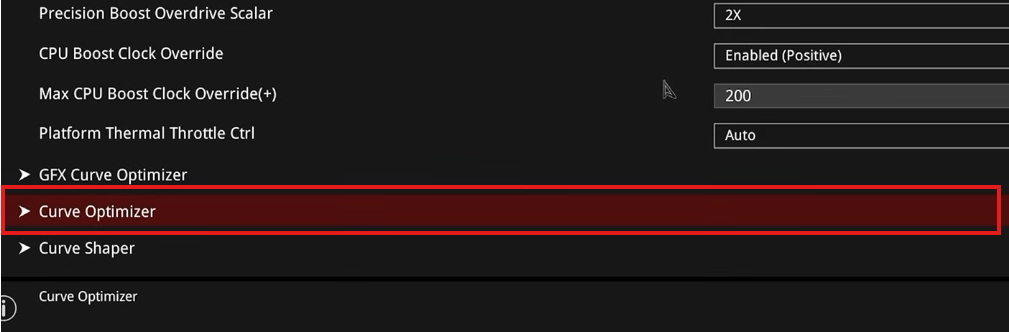
You get four options in the curve optimizer section. They mean different things.
- Disable: Curve Optimizer is completely off.
- All Cores: Apply one CO value to every CPU core. This is the best place to start because it is simple to configure and test.
- Per Core: Apply a different CO value to each individual core. This is useful when you have tested the CPU enough to know that some cores tolerate a larger negative offset than others.
- Per CCD: This is for CPUs with multiple CCDs. Instead of setting one value for every core or one value for every individual core, you give each CCD its own CO value. This is suitable for multi-CCD Ryzen 9/Threadripper-type processors where the CCD has different characteristics
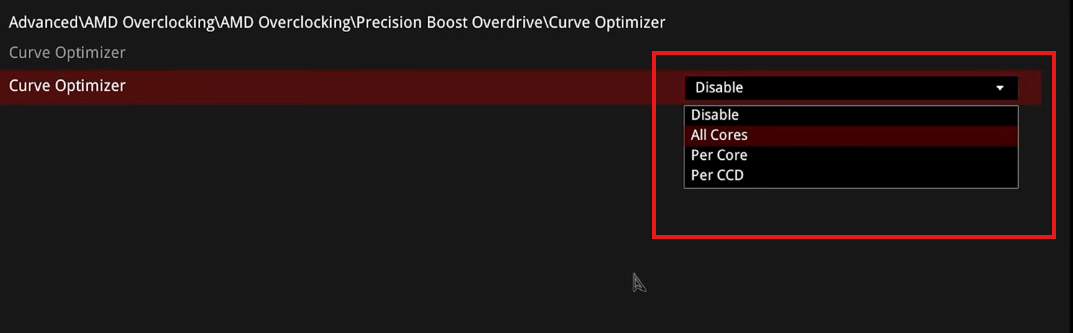
For this guide, we are going to select the All Core option imagining that you have a multi-core workload for which you are optimizing your system.
We will keep the All Core Curve Optimizer sign negative. Then set the All Core Curve Optimizer Magnitude at 20 or 25.
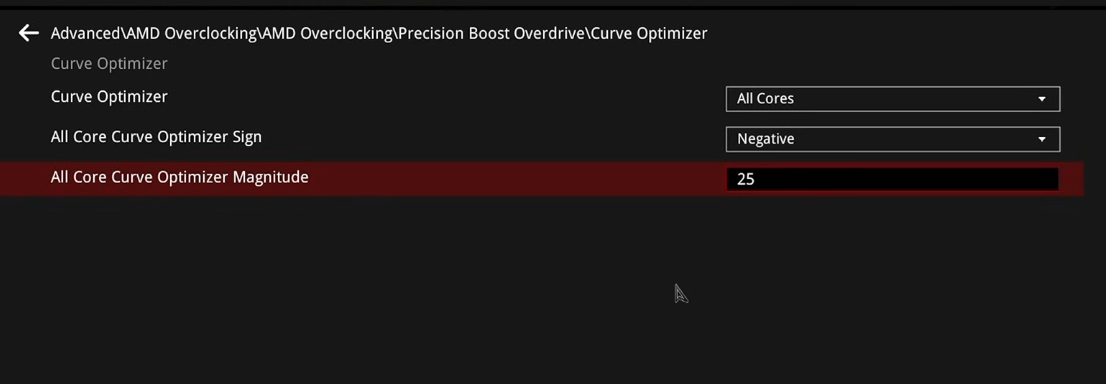
With these settings, we are basically trying to lower the voltage required at a given frequency. 25, or the number that we set, is the strength of the adjustment. Keep in mind that this isn’t 25 mV but rather the magnitude. Larger negative numbers mean a more aggressive undervolting adjustment. So, each step pushes the voltage/frequency curve further in the negative direction. This is mainly to reduce the temperature so that the processor gets more thermal headroom to achieve higher boost clocks for longer.
In case you have a processor that has two CCDs like 9950X3D, you get two points to set with the same options rather than one.
Now, you just save your system and restart your computer.
For most of you, this was more than enough as an overclock.
We discussed the Max CPU Boost Clock Override. It is basically the maximum allowed boost frequency above its factory-rated maximum boost clock. It simply raises the ceiling that Precision Boost can target. But there is a limit to it, which is generally +200 MHz. However, there is a way to bypass that Max CPU boost clock override limit and achieve even higher frequency.
In this process, we increase the BCLK (base clock), which I might discuss in another article because it can be a little troublesome in some cases.
Step 5: Checking for Stability
Because we just allowed PBO some more headroom and adjusted the manufacturer-given settings, we do not have to run the benchmarks and stability tests too hard. You can again run the Cinebench to see the changes in your scores. But, it is important to check stability after any changes to voltage or frequency. Below is the detailed guide for you.
Just install and open it. Click the System Stability test option on the top and make sure to select all four checkboxes, i.e., Stress CPU, Stress FPU, Stress cache, and Stress system memory.
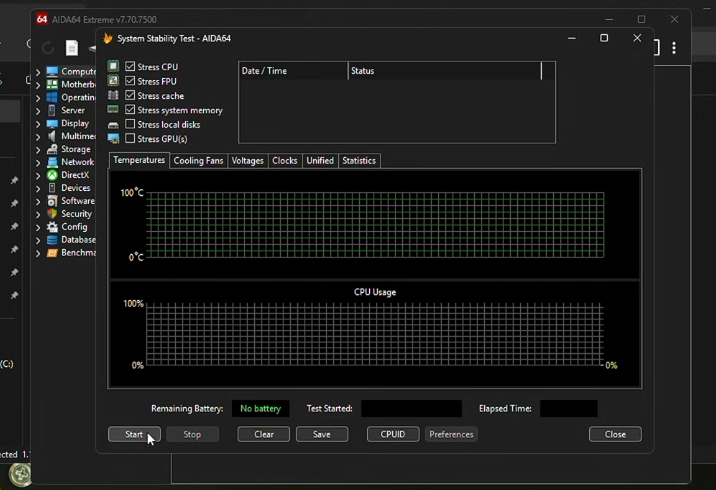
If this passes the test, you are fine. Otherwise, if you see the temperature going very high (which will be highlighted in the AIDA64 graphs), you should first confirm in HWiNFO if you are actually hitting the thermal throttling.
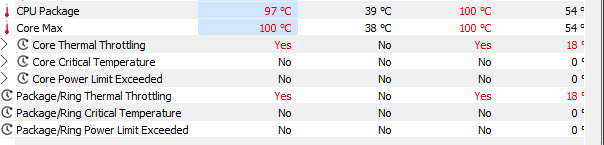
If the thermal throttling is reached, you should first reduce the PBO power limits that we increased in the first section. Lower PPT first. PPT is the total socket power limit, so reducing it directly limits how much power the CPU can consume. Check the temperatures again, and if they are still high, adjust TDC and EDC (if necessary). I would not suggest making the curve optimizer more negative, thinking less voltage means less temperature. You can reduce it as long as you do not hit stability. But, first try to adjust the maximum workload to the CPU, and maybe also look at your cooling setup.
For example, suppose your CPU reaches 90°C at 190 W during a heavy workload. If you reduce PPT so that the CPU settles around 160–170 W, you might lose some multi-core performance, but temperatures can fall considerably while gaming performance changes very little. This is often a better trade-off than forcing a fixed lower clock because Precision Boost can still use the remaining power intelligently.
About per-core frequency overclocking
In my honest opinion, per-core frequency overclocking is generally not worth it for a normal Ryzen system. Modern Precision Boost already manages individual cores intelligently, so manually assigning different frequencies often gives you a very small performance gain for a lot of testing and stability validation. I would prioritize PBO + per-core Curve Optimizer (for undervolting) + Boost Clock Override instead. The whole process was discussed above.
Per-core frequency tuning will make more sense if you are chasing benchmark records or trying to squeeze out the absolute last bit of single-threaded performance from a particular CPU. For most people, this risk is not worth taking. You will require a lot of tests and trials along with a highly powerful cooling setup to run your system through rigorous benchmark tests and stress tests.
I have seen many examples of people wasting their time in these very complex manual overclocks. For example, if a CPU can normally boost one preferred core to 5.2 GHz, another to 5.1 GHz, and weaker cores to 5.0 GHz, manually setting them to 5.3/5.2/5.1 GHz might look attractive. But Precision Boost may already reach close to those frequencies when temperature, voltage, and power conditions allow. A per-core curve optimizer could instead reduce the voltage required by each core, allowing Precision Boost to sustain higher clocks more efficiently without you having to manually manage every core’s frequency.
Undervolting makes much more sense on modern CPUs
Modern CPUs already operate near the limits of their voltage, temperature, and power envelopes. Instead of trying to force a higher clock with more voltage, undervolting can make the CPU more efficient. This eventually gives the PBO additional thermal and power headroom to maintain higher frequencies. So, the processor lottery that we talk about is now not about the higher clock speeds but the higher efficiency.
If a CPU previously needed 1.20 V to sustain a certain clock but can now achieve it at a lower voltage, it produces less heat and consumes less power. That lower temperature can then allow Precision Boost to sustain higher clocks or boost more frequently. So, modern overclocking means that we allow the existing boost algorithms the headroom to operate properly. It is not about building a new system. The manufacturers already try to keep the usage higher and take the boost clocks to their utmost limits.
We just have to employ a good cooling setup and undervolt the CPU a little bit, and we are set. Our CPU is going to work at its best speeds.