

In simple words, undervolting means running your CPU at less voltage than it asks for while keeping the same clock speed. The whole idea is not to slow the chip down or choke its voltage so it just shuts down. It is about providing it just enough voltage to get the same work done.
Although not all CPUs are the same, Intel has to set a voltage curve that works on every single chip that comes off the line, including the worst one. So there is almost always some margin sitting in there that your particular chip never needed. Undervolting is just claiming that margin back. In our Intel overclocking guide, we discussed voltage as the thing you give the CPU in exchange for frequency. This article is the other direction. It is about allowing you to achieve the same results while generating less heat.
Intel CPU Undervolting Guide
With undervolting, you are reducing the input voltage to the CPU (whether you have raised the multiplier or not). In some computers, under load, the temperature can go very high even at stock speeds. This happens primarily due to poor cooling. In that case as well, undervolting can help you a lot.
So, let’s get started.
Which Intel processors can be undervolted?
There are two compability lists when it comes to undervolting Intel processors. The first one is Plundervolt for every mobile and desktop Intel Core processor from 6th generation Skylake onwards. The processors in the generation that supports SGX were vulnerable to a software attack that injects faults by briefly dropping processor voltage. Intel’s fix was to disable MSR 0x150, the overclocking mailbox interface. That’s the register ThrottleStop and XTU use. OEMs applied it via BIOS updates, which is why so many 8th–11th gen laptops lost undervolting overnight.
However, if you have a processor with 12th generation onwards, they will most likely have undervolt protection. UVP is a microcode/processor feature that stops voltage from going below a minimum defined by the BIOS value or the processor default if not configured. It’s only available on 12th Gen Core and newer. However, BIOS undervolting stays available even with UVP enabled. It is the runtime (OS-level) undervolting that gets blocked. Basicaly, UVP can only be disabled on specific overclockable configurations: certain unlocked K/KF/KS/X processors paired with a Z or X chipset.
The Intel undervolting scene looks something like this.
| Generation | BIOS undervolt | Software (XTU/ThrottleStop) |
|---|---|---|
| 4th–9th gen (Haswell–Coffee Lake R) | Yes, board dependent | Yes, unless OEM applied the Plundervolt BIOS lock |
| 10th–11th gen (Comet/Rocket Lake) | Yes | Yes on unlocked SKUs, no UVP exists yet |
| 12th gen (Alder Lake) | Yes | Only K/KF/KS + Z chipset with UVP off |
| 13th/14th gen (Raptor Lake / RPL-R) | Yes | Only K/KF/KS + Z chipset with UVP off |
| Core Ultra 200S (Arrow Lake) | Yes, well supported on K SKUs | Same restriction |
| Core Ultra 200S Refresh | Yes | Same restriction |
If you have got the Arrow Lake Refresh processors like the Core Ultra 7 270K, which are launched after March 11, 2026, undervolting P-Cores and E-Cores separately in BIOS is standard practice. In the locked non-K processors, Intel doesn’t provide undervolting controls. So, system manufacturers generally set the undervolt options in the BIOS. Voltage can be indirectly controlled through the AC load line though. But, in practice, the voltage offset control on B-series boards is sort of hit and miss, especially with newer microcodes.
There’s a well-documented community workaround on B660/B760 involving rolling back to microcode 0x104 to restore adaptive offset options, but that reintroduces the vulnerability and is not something I’d recommend to you.
If we talk specifically about the 13th- and 14th-generation CPUs, the instability comes from the processor requesting dangerously high voltage that permanently damaged silicon. 0x129 capped it at 1.55V. Common advice now is that on a 13900K/14900K you’re better off tuning PL1/PL2 than chasing an aggressive undervolt, partly because an undervolt can mask early degradation rather than prevent it.
I have seen a lot of people complaining that they are not able to undervolt their CPUs while they were making adjustments from XTU. In most cases, the BIOS offset would have worked fine. This guide will also revolve around XTU because BIOSs are different. But the strategy (step-by-step decrease) remains the same.
The Problem
My system configurations are
- CPU: Intel Core i5 12600K
- Motherboard: MSI Pro Z690-A
- RAM: DDR5 16GB (running at 4800 MHz)
- Storage: Gen 4.0 NVMe
- Cooler: 240mm AIO
Now, look at when I run the Cinebench at the stock settings. The CPU reaches the maximum of 4.2 GHz in the all-core workload. Although the maximum P-Core frequency is 4.9 GHz on this CPU. But it happens mainly when the load is mainly on one or two cores.
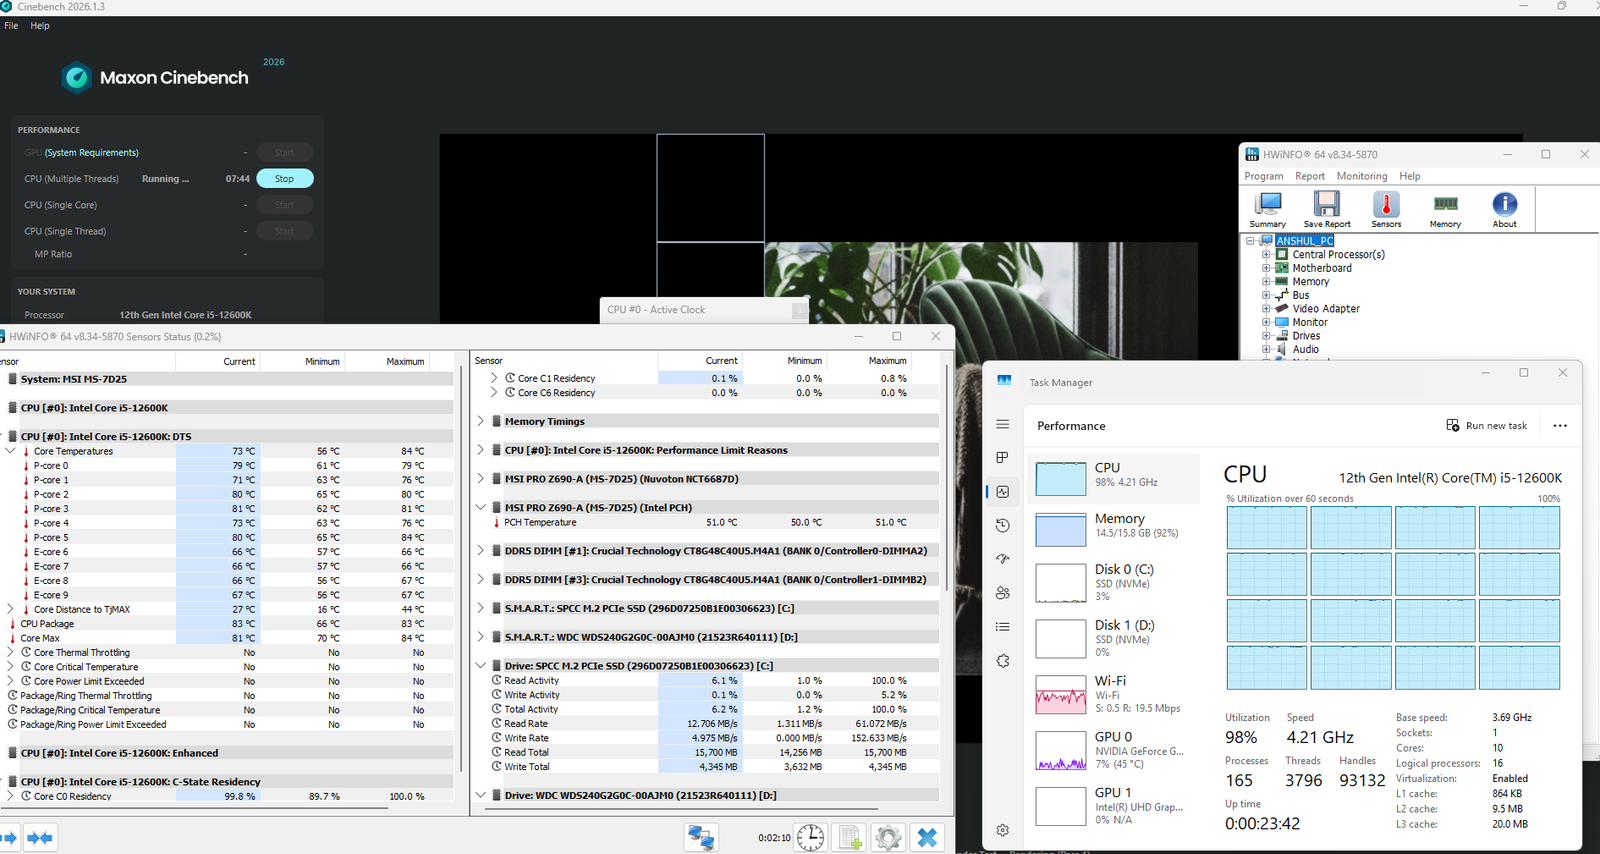
The maximum temperature the CPU reached during the whole test was 89°C. This is a very acceptable range. I didn’t hit any throttle limit here. It is possible that your system hits it without any overclocking. But I am going to do a simple overclock just to show you how it works.
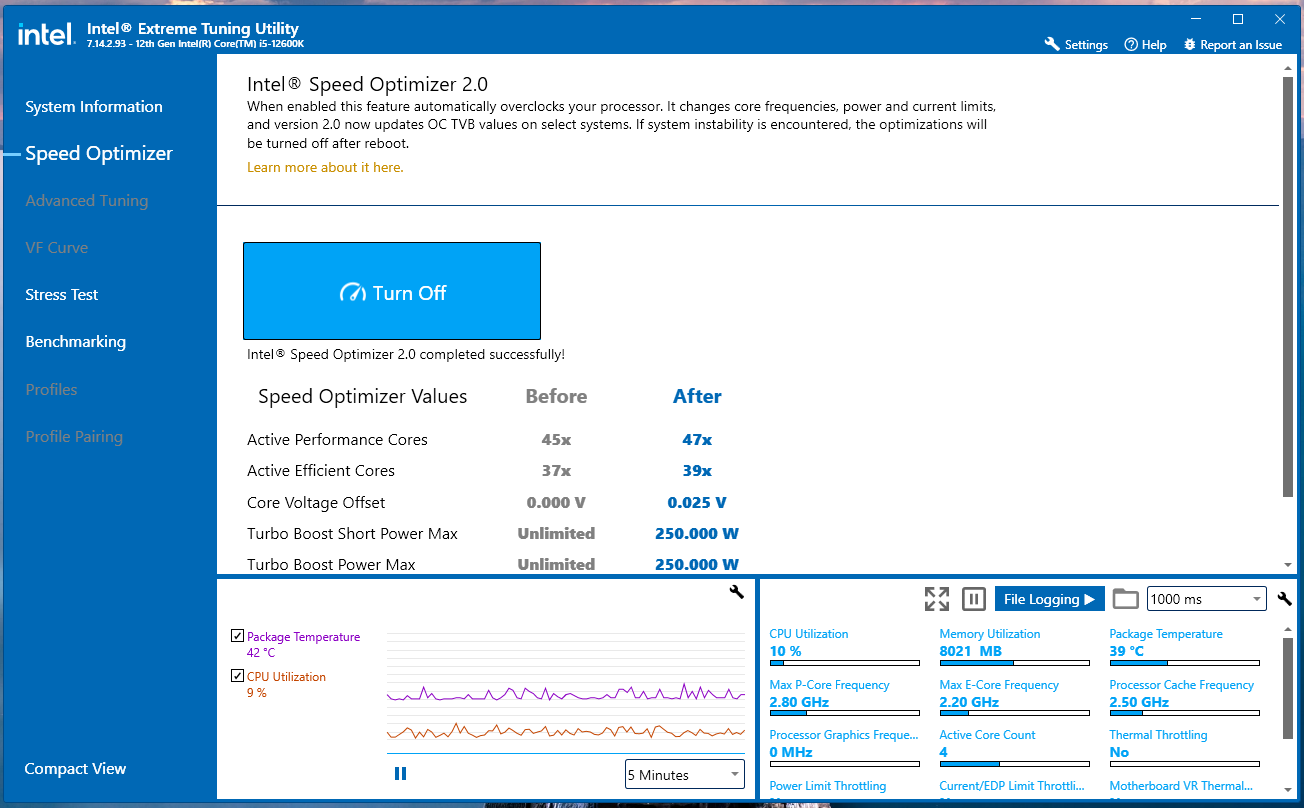
Let’s apply an automatic overclock to the CPU decided by Intel itself through its own software, i.e., Intel Extreme Tuning Utility or XTU.
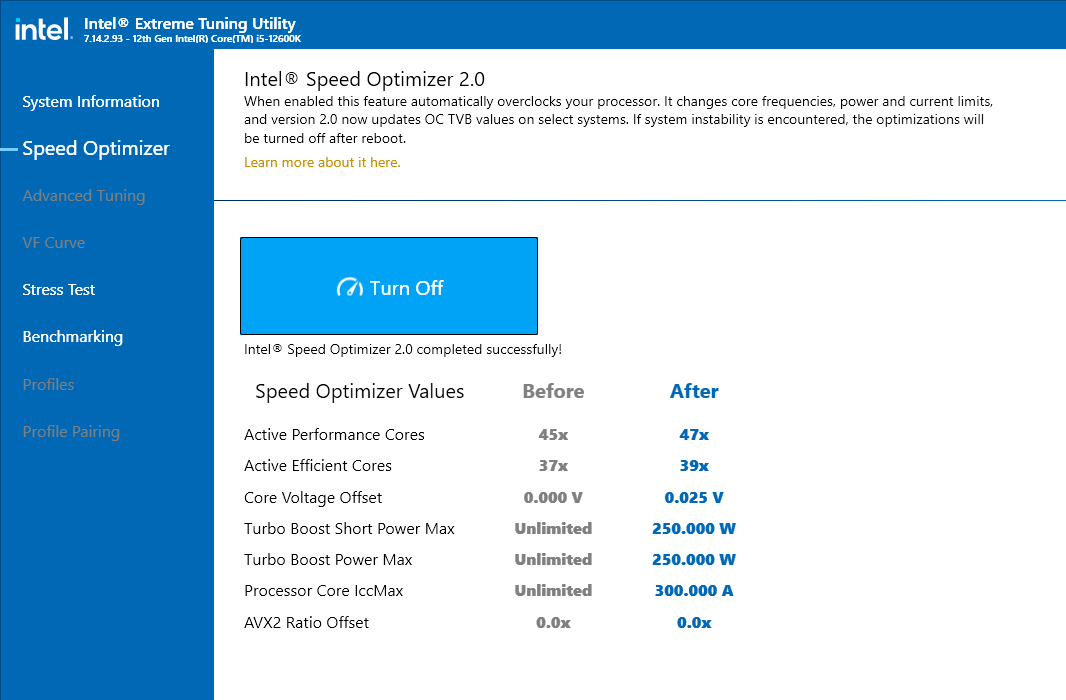
The software automatically decided to take the multiplier from 45x to 47x for P-Cores and 37x to 39x on E-Cores. The core voltage offset is also increased along with the Turbo Boost Short Power Max and Power Max. The core IccMax is set to 300 amps, and the AVX2 ratio is set to 0.0x. Now, let’s run the benchmark again.
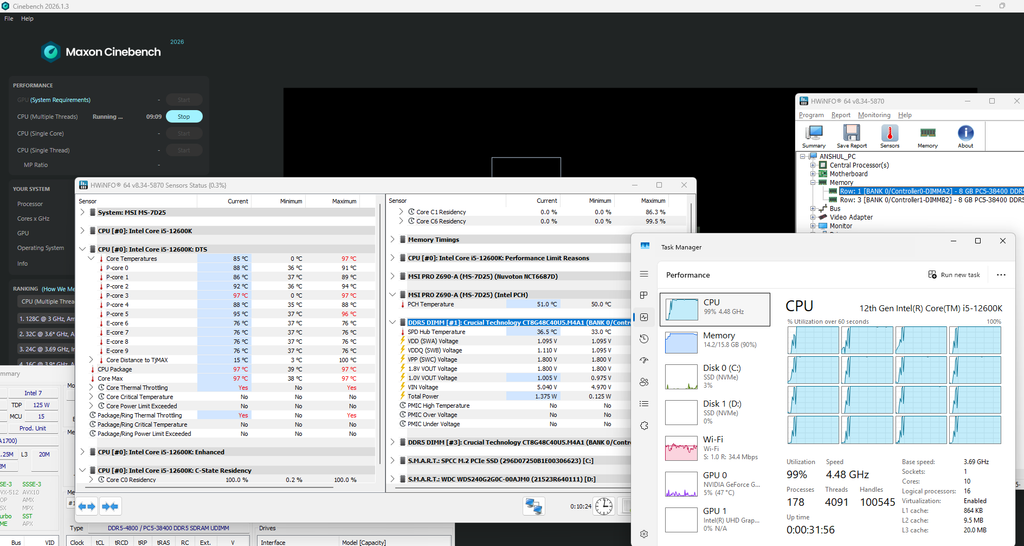
The HWiNFO sensors started to turn red almost immediately. The package temperature climbed into the 97 to 100°C range within seconds, and it stayed around there for most of the run.
The automatic XTU overclock isn’t particularly great in this configuration. It increases the P-core and E-core ratios and raises the voltage/power requirements, but the additional performance comes at the cost of substantially higher temperatures. HWiNFO never raised the thermal throttling flag in my run, but the chip was sitting a degree or two under Tjmax, which is 100°C on this CPU. So, there was no headroom left. A longer render, a warmer room, or a dusty radiator and it throttles. At that point the extra frequency stops being a clean performance gain, and the automatic overclock is hard to justify without either better cooling or a proper voltage and power limit tune.
The CPU pulled a peak power of about 172 W. Keep in mind that 150 W is the stock maximum turbo power, or PL2, of the 12600K. So, that 172 W peak is only possible because the Speed Optimizer raised the Turbo Boost Power Max above Intel’s own limit. The overclock is not just adding frequency here. It is also unlocking the power budget that was holding the chip back.
Although the cooler-to-CPU power ratio isn’t always 1:1, it is worth mentioning that my 240mm AIO is rated for 180 watts of TDP. It is possible that it is not able to dissipate all that heat. So, if I want to sustain this type of workload and prevent throttling, I should ideally be upgrading my cooling setup. But there is another thing that we can do. We can reduce the voltage while keeping the same frequency until we reach the minimum level of required voltage.
Less voltage means a lot less power, and not in a straight line. The switching power of a CPU works out roughly to Power = Capacitance × Voltage² × Frequency. Voltage is squared in that equation, because dropping the voltage also drops the current the cores pull, and the two reductions multiply.
So, going from 1.34 V to 1.19 V is only about a 11% cut in voltage. But 1.19² ÷ 1.34² = 0.79, which is roughly a 21% cut in power before the frequency has changed at all. So, if we can hold the same frequency at a lower voltage, we generate noticeably less heat and hand that thermal headroom back to the chip so it can sustain those clocks.
Note: I performed this overclock just to hit a higher temperature so that I can show you how I got it down. Later in the article, I will do a manual overclock to increase the frequency further and keep the thermals under limits. It is possible that some systems hit throttling even without a significant load. It can happen due to your cooler configurations as well. The solution (discussed below) will remain the same for everyone.
Undervolting as a solution to high temperature
In our Intel overclocking guide, we discussed that undervolting is not only about finding the lowest possible voltage for a given frequency. It is more about finding the best balance between frequency, voltage, stability, power consumption, and temperature.
For example, if a 47× P-core ratio requires substantially more voltage than your cooler can comfortably dissipate, running 46× at a significantly lower voltage may produce almost the same performance while avoiding thermal throttling.
So, in this case, our goal will be to keep the automatic XTU overclock, gradually reduce the voltage, and see whether I can retain the higher clocks without hitting 100°C
Steps to Undervolt an Intel CPU
The goal here is never to guess a final voltage but to undervolt incrementally, followed by proper testing. Intel itself recommends making small changes and testing after each change. Its XTU guide specifically identifies Core Voltage Offset as the control for shifting the CPU’s voltage from its default level
We have already established our baseline in the example above, but I would recommend you write down your system’s baseline with these records.
Step 1: Establish your baseline on stock settings
Record:
- Cinebench score (multi-thread)
- Maximum CPU temperature
- Average CPU Package Power
- Maximum CPU Package Power
- P-core effective clock
- E-core effective clock
- Vcore
- Whether HWiNFO reports thermal throttling
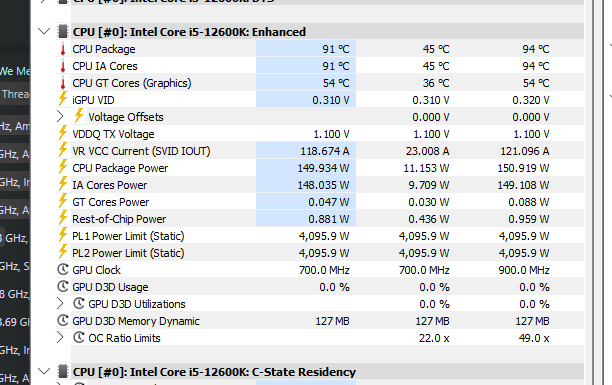
In my case, my CPU was taking roughly 150 W package power and was at ~100°C (with XTU Speed Optimizer). You’ll have to find your baseline like this on stock settings. I didn’t hit the throttling point, but if you are hitting that, it is one of the most important points to note down.
Step 2: Open XTU
Download, install, and open Intel Extreme Tuning Utility.
Head to the Advanced Tuning section and you should see the options for the CPU ratios and voltage. Since you’re already using the automatic overclock, don’t change the multipliers yet. If you have already applied automatic overclock, the Advanced Tuning option won’t be highlighted. Just disable it for now.
Step 3: Adjust Multipliers (if necessary)
If your goal is simply to reduce power consumption and temperature without overclocking, you can go to the next step. However, if you want to undervolt along with overclocking, I would recommend going through this guide first. I have explained the multiplier settings here, so I do not want to repeat them again.
For this guide, I am raising the multipliers to increase the power intake and raise the temperatures. I will take the all-core frequency to a 49x ratio and nothing else.
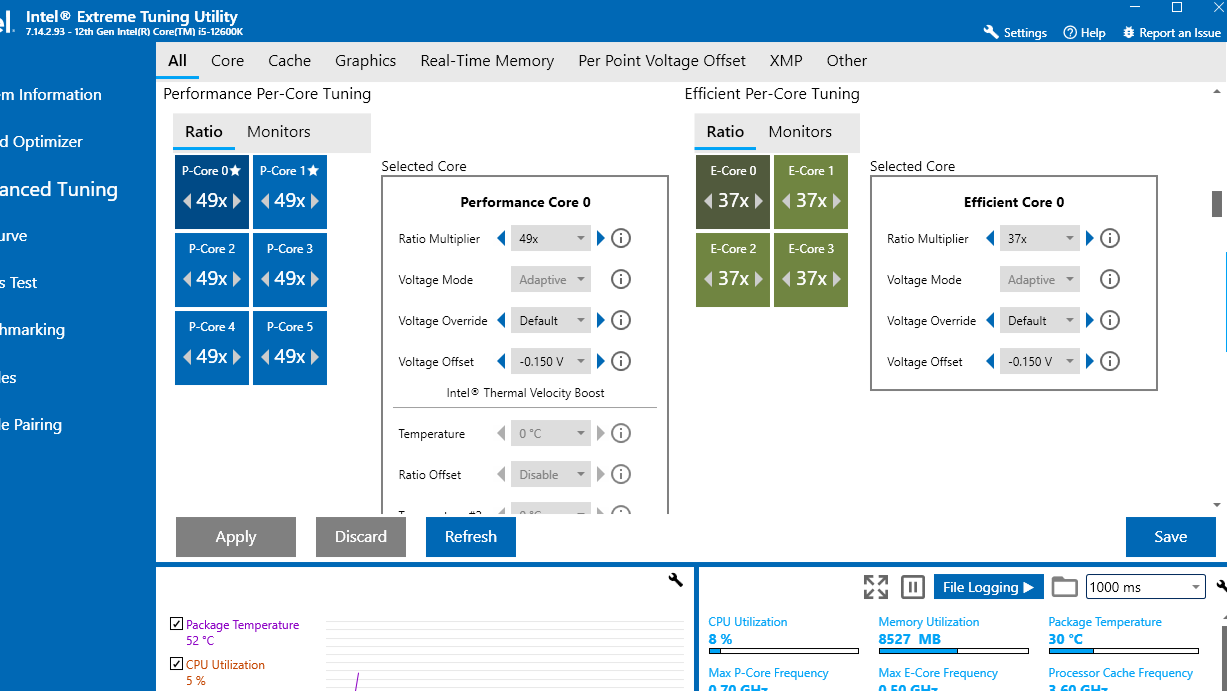
Step 4: Undervolting
XTU allows you to adjust core voltage for each core specifically, but because we are not overclocking on a per-core basis here, we will adjust the core voltage offset right away. To be specific, we will apply a negative offset something like this:
0 mV → -10 mV → -20 mV → -30 mV → -40 mV…
Core voltage offset is simply a way of telling the CPU to add or subtract a certain amount of voltage from the voltage it would normally request. Think of it as a correction applied to the CPU’s normal voltage curve. So, if your CPU requests 1.25 V normally and you set the core offset voltage to (-50 mV), the CPU will shift down to 1.25 V − 0.05 V = 1.20 V. Likewise, a positive offset of +50 mV would move it toward 1.30 V.
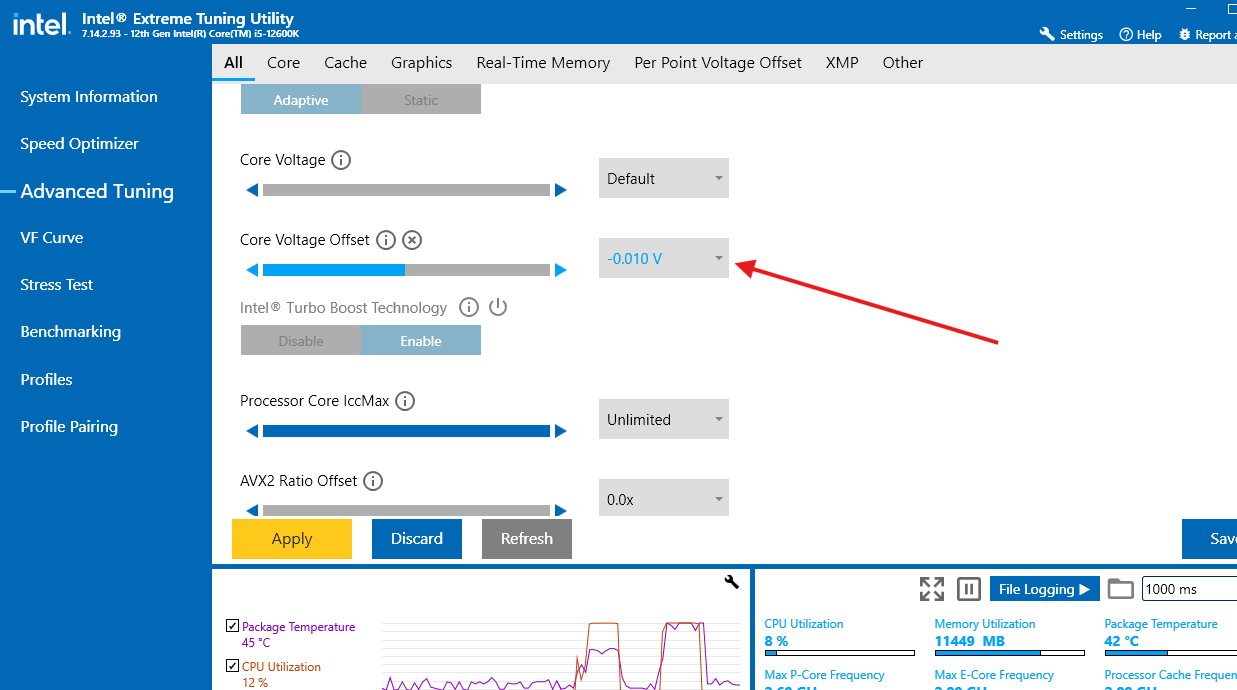
Don’t immediately jump to something like -50. After each negative offset, run the Cinebench and check the change in the temperature and CPU package power. If the power and temperature are still high, take one more step down. -30 mV, then -40 mV, and so on.
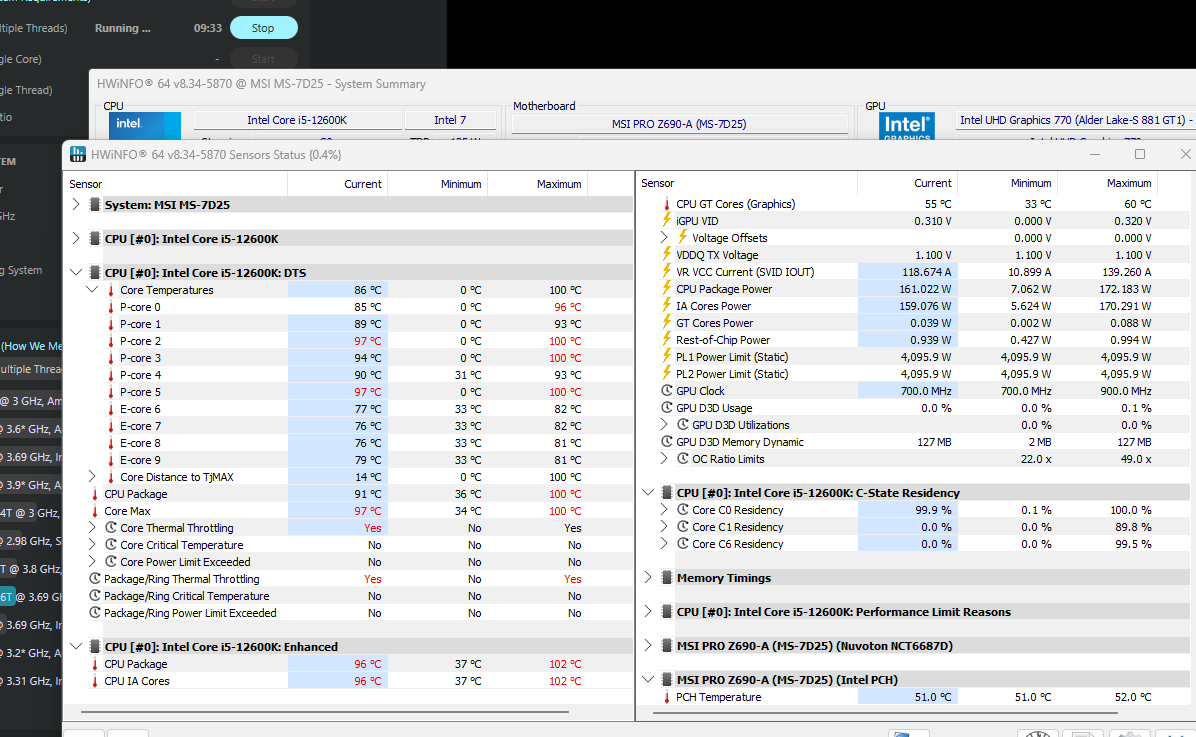
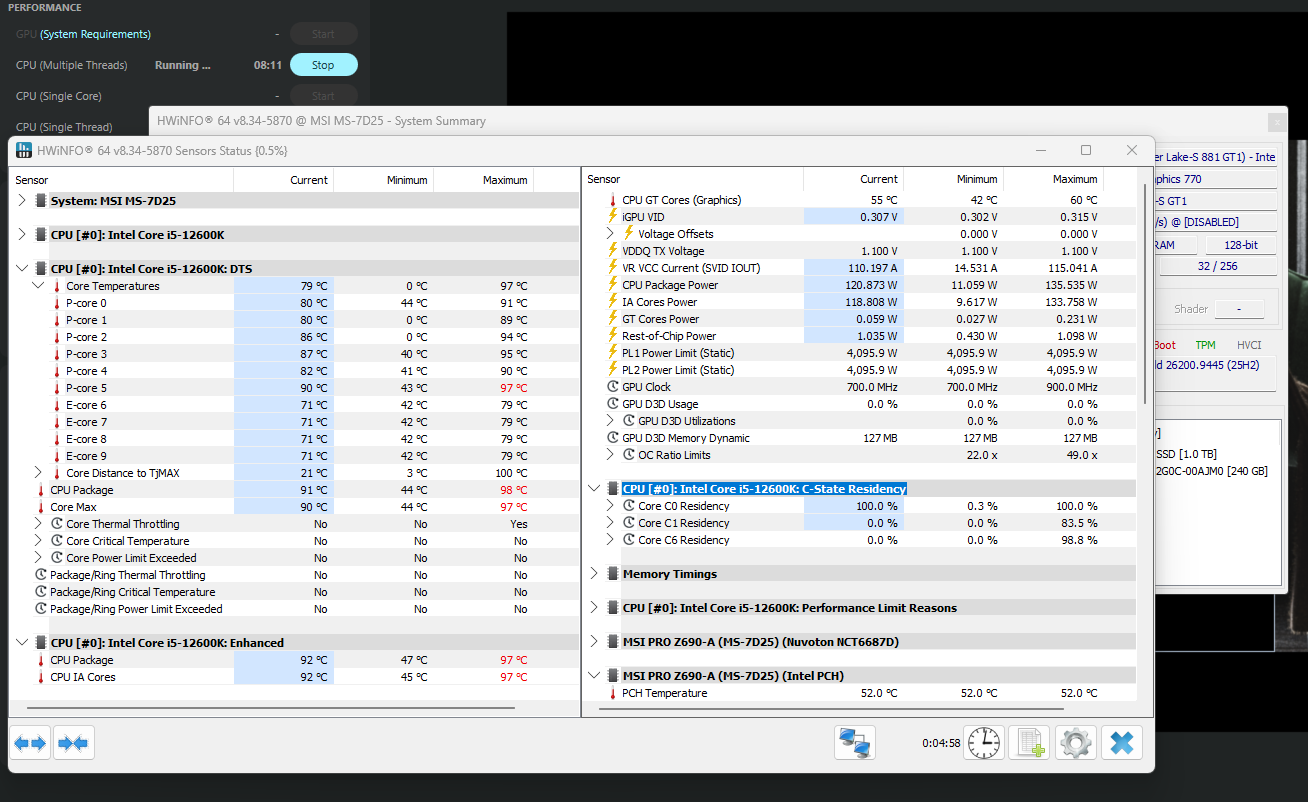
In my case, I started to see significant results at a negative offset of -25 mV. The maximum package power that I hit earlier was around 172 watts, but with this voltage offset, it is now averaging at around 160 (as you can see in the screenshot above).
During these voltage changes, you are looking to hit either of these things:
- Cinebench crashes
- Windows freezes/reboots
- Application crashes
- Calculation errors
- WHEA errors in HWiNFO/Event Viewer
- Significant clock-frequency abnormalities
- Failure during longer workloads
If you hit any of these, it means you have gone one step past what your chip can take. A crash is not the finish line; it is the marker for where the finish line was. So, back off to the last offset that ran clean and test that one properly. If you hit a crash at -40 mV, use -30 mV as your working point and perform longer stability testing.
My 12600K was able to take a -150 mV offset. Vcore under load settled at around 1.19 V, the package power came down from 172 W to roughly 120 W, and the maximum temperature was 90°C instead of 100°C. The Cinebench score stayed almost the same. So, I kept the entire overclock and gave back nothing for it, while pulling 50 W less out of the same cooler. That is the whole reason anyone undervolts. Look at the screenshot below.
The Results
I have divided the results into two sections, i.e., with the XTU Speed Optimizer and undervolting. Although this article was not about increasing the performance, I thought of mentioning that as well because I have increased the multiplier. With this overclock, I achieved a good temperature through my undervolt settings. So, I just wanted to show you these.
| Stock | XTU Speed Optimizer (without undervolting) | Speed Optimizer + -150 mV | |
|---|---|---|---|
| P-core ratio | 45x | 47x | 47x |
| E-core ratio | 37x | 39x | 39x |
| Vcore under load | 1.20 V | 1.20 V | ~1.14 V |
| Max temperature | 89°C | 100°C | 85 – 90°C |
| Avg package power | 125 W | 160 W | ~120 W |
| Max package power | 150 W | 172 W | 130 W |
| Cinebench multi | 3760 | 4001 | 4020 |
| Thermal throttling | No | No | No |
Conclusion
My 12600K held a 47x all-core overclock at 120 W and 90°C after a -150 mV offset. That is 50 W less heat going into the same 240 mm AIO for the same score. But I would not promise you -150 mV. Every chip is different, and that is silicon binning doing its thing. Your number might be -60 mV, and that is still worth having. Go in 10 mV steps, test after every step, and treat the first crash as information rather than a failure.
If I wanted, I could have raised the multiplier further and reduced the voltage a bit more to achieve even better results at the same or even lower temperature. But I didn’t want to make my computer shut multiple times or hit throttle limits. I